If you've been in the email marketing field, you've probably heard some discussion about the subject of email delivery (the ability of your emails to...
Key Takeaways
- Mobile apps restrict bulk deletion; the fastest way to delete thousands of emails requires desktop browser access.
- Deleted emails go to a Trash or Deleted Items folder for 30 days before permanent deletion, giving you recovery time if needed.
- Use search filters to delete emails from specific senders, date ranges, or categories without removing everything.
You stopped checking your inbox months ago because finding anything useful became impossible. You’re ready to start over, but with more than 10,000 emails in your inbox, the thought of clicking delete on thousands is enough to make you close the app again.
Inbox overload is annoying and quietly drains your time and focus. Important messages get buried under promotional clutter, and you lose minutes every day scanning emails that don’t matter, trying to spot the ones that do. Even your email app slows down, because it’s managing thousands of messages you’ll never read.
However, inbox overload is not a personal failure. An estimated 376.4 billion emails are sent and received worldwide every day, and the average person receives well over 100 emails daily. Without intentional cleanup, inboxes become unmanageable by default.
This guide shows you how to delete all emails quickly and safely across Gmail, Outlook, and other providers using the bulk tools each platform already has. You’ll see the fastest ways to do it on desktop and mobile, how to use search to target specific senders or time ranges, and what to double-check before you permanently clear everything out.
How to Delete All Emails
Most email providers limit how many emails you can select at once by default. When you check the “select all” box, it typically selects only the 50-100 messages visible on screen, not your entire inbox.
The key to deleting thousands of emails at once is using the bulk selection option that appears after you select visible messages. This option (worded differently across providers) lets you select all conversations matching your current view or search, not just what’s on screen.
In Gmail (Web Browser)
Gmail’s web interface provides the most reliable method for bulk email deletion, as mobile apps don’t support true bulk selection.
Step-by-step process:
- Open Gmail in a desktop browser. Go to gmail.com and log in.
- Navigate to the folder you want to empty. Click Inbox, or use category tabs like Primary, Promotions, or Social. You can also select Spam or Trash directly.
- Select all visible emails. Click the checkbox at the top left, above your email list. This selects the 50 emails currently visible on screen.
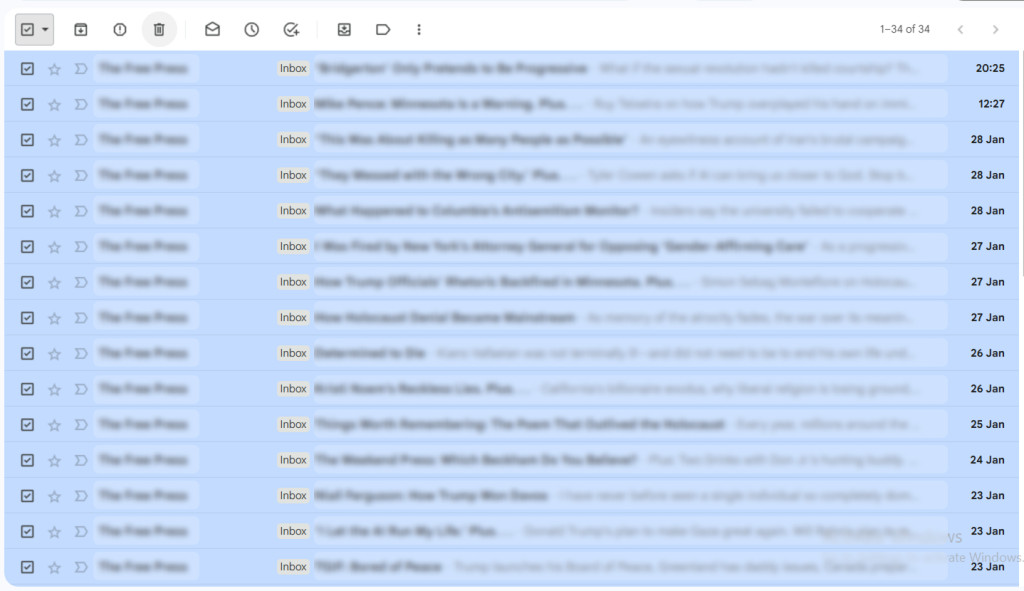
- Select all conversations in this view. After selecting visible emails, Gmail displays a message at the top: “All 50 conversations on this page are selected. Select all conversations that match this search.” Click that link.
- Delete selected emails. Click the trash icon in the toolbar. All selected emails move to Trash immediately.
- Repeat for other folders. If you want to clear multiple categories, repeat the process for Promotions, Social, Updates, etc.
Important notes:
- Emails moved to Trash stay there for 30 days before permanent deletion
- You can permanently delete immediately by going to Trash, selecting all again, and clicking “Delete forever”
- Gmail won’t let you select across multiple folders simultaneously; you must clear each category separately
In Outlook (Web & Desktop)
Outlook’s bulk deletion works similarly across web and desktop versions, though keyboard shortcuts vary slightly.
Outlook Web (outlook.com or office.com):
- Open Outlook in your browser. Navigate to outlook.com or log in to your Microsoft 365 account.
- Select all emails in the current folder. Click the checkbox at the top left to select all visible messages.
- Expand selection to the entire folder. Look for the “Select all” option that appears above the message list, typically saying “All messages on this page are selected. Select all messages in [folder name].” Click it.
- Delete selected messages. Click the Delete button (trash icon). Messages move to Deleted Items.
- Empty Deleted Items to permanently remove. Go to the Deleted Items folder, select all, and click Delete to permanently remove messages.
Outlook Desktop App:
- Click any email in your inbox
- Press Ctrl+A (Windows) or Cmd+A (Mac) to select all emails
- Press Delete key or click the Delete button
- Repeat in Deleted Items folder to permanently remove
Focused vs. Other inbox:
If you use Focused Inbox, you’ll need to clear both the Focused and Other tabs separately. Switch between tabs and repeat the selection process.
Other Email Providers
Most email providers follow similar patterns for bulk deletion, though specific interface details vary.
Yahoo Mail:
- Select all visible emails using the checkbox
- Look for “Select all conversations” link that appears
- Click Delete or Move to Trash
Apple Mail (iCloud.com):
- Select first email, then press Shift and click last visible email to select range
- Use Cmd+A to select all in current folder
- Click trash icon to delete
Proton Mail:
- Click checkbox to select visible emails
- Use “Select all [number] items” option
- Click Delete or Move to Trash
General approach for unfamiliar providers:
- Look for a “select all” checkbox above your email list
- After selecting visible emails, check for a prompt or link to select all emails in the folder
- Find the delete or trash button in the toolbar
- Confirm deletion when prompted
Most providers include bulk selection limits (typically 1,000-10,000 emails per action) to prevent server overload. If you have more emails than the limit, repeat the process until the folder is empty.
On Mobile Devices
Mobile email apps intentionally restrict bulk deletion because touching hundreds or thousands of emails on a small screen is error-prone and difficult to undo.
iOS Mail App:
The native Mail app on iPhone and iPad doesn’t support true bulk deletion. You can:
- Select multiple emails by tapping Edit, then tapping individual messages
- Delete selected emails by tapping Trash
This works for dozens of emails, not thousands. For inbox-wide cleanup, use a desktop browser.
Gmail Mobile App:
Gmail’s mobile app limits selection to visible emails and doesn’t provide the “select all conversations” option available on desktop. You can select and delete 50-100 at a time, but clearing thousands this way is impractical.
Outlook Mobile App:
Similar to Gmail, Outlook’s mobile app restricts bulk actions to visible messages only.
If you need to delete more than 100 emails, switch to a desktop or laptop computer and use the web interface. Mobile deletion is functional for small-scale cleanup but becomes tedious for large-scale inbox clearing.
How to Delete Emails Using Search and Filters
Search-based deletion lets you target specific subsets of your inbox, including particular senders, date ranges, or keywords, without clearing everything.
Delete emails from a specific sender:
- In Gmail:
from:[email protected]

- In Outlook:
from:[email protected]
After searching, select all results using the bulk selection method described earlier, then delete.
Delete emails older than a specific date:
- In Gmail:
before:2023/01/01

This shows all emails received before January 1, 2023. Select all and delete.
- In Outlook:
Use the date filter in the search bar or filter pane to show emails before a specific date, then select all and delete.
Delete unread emails only:
- In Gmail:
Is:unread

- In Outlook:
Use the filter dropdown to show “Unread” messages only.
Delete by category or label:
- In Gmail:
category:promotions
Shows all promotional emails. You can also just click the Promotions tab directly.
Combine search criteria:
Gmail lets you stack filters:
from:[email protected] before:2024/01/01 is:unread

This shows unread emails from a specific sender before January 2024.
Why search-based deletion is useful
You might want to keep work emails but delete all newsletters, keep recent messages but remove everything older than two years, or eliminate promotional clutter while preserving personal correspondence. Search lets you be selective rather than deleting everything indiscriminately.
How to Use Third-Party Tools to Delete Emails
Third-party email management tools can automate bulk deletion, especially when managing multiple email accounts or applying complex rules across thousands of messages.
What third-party tools do
These services connect to your email account via OAuth (the same secure method many apps use) and provide interfaces for:
- Bulk unsubscribing from newsletters and promotions
- Deleting emails based on age, size, sender, or engagement
- Managing multiple email accounts from one dashboard
- Scheduling automatic cleanup rules
What to do before connecting a third-party tool
Review what permissions the service requests. Legitimate tools ask for:
- Read access to analyze your inbox
- Delete/modify access to perform cleanup actions
- Send access (optional, for some features)
Be cautious with tools requesting excessive permissions or from unknown developers. Major providers like Google and Microsoft show detailed permission screens, so read them carefully before authorizing.
Limitations:
Third-party tools typically work best for ongoing management and gradual cleanup. If you want to delete your entire inbox right now, the built-in bulk selection methods in Gmail or Outlook are usually faster than setting up a third-party service.
What to Know Before You Delete Everything
Bulk deletion is fast and effective, but it’s also irreversible after emails are permanently removed. Consider these points before clearing your inbox.
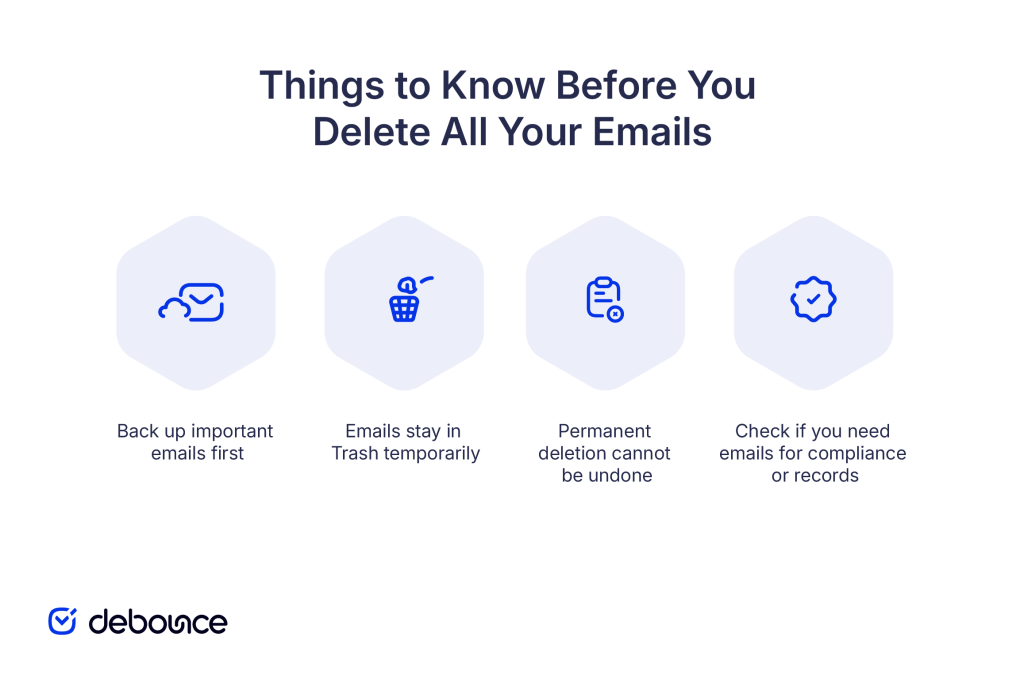
Back up important emails first
Before you delete everything, export or save emails you might need later:
- Work correspondence related to ongoing projects
- Receipts or transaction confirmations for purchases
- Legal or financial documents
- Personal emails with sentimental value
Most email providers offer export tools (Google Takeout for Gmail, Outlook export features) that download your entire mailbox as an archive file you can store locally.
Emails stay in Trash temporarily
When you delete emails, they move to Trash (Gmail) or Deleted Items (Outlook) and remain there for 30 days before permanent deletion. During this window, you can recover messages if you realize you deleted something important.
To recover from Trash:
- Open the Trash/Deleted Items folder
- Select emails you want to restore
- Click “Move to” and select Inbox or another folder
Permanent deletion cannot be undone
Once you empty Trash or wait 30 days, deleted emails are gone permanently. Email providers don’t maintain backups of deleted messages after this period. If you’re unsure about deleting everything, consider archiving instead. Archived emails leave your inbox but remain searchable and recoverable indefinitely.
Check if you need emails for compliance or records
Some industries and roles require retaining emails for specific periods:
- Legal communications may need to be preserved for litigation
- Financial records often have retention requirements
- Work emails might be subject to company retention policies
If you’re deleting work or business emails, verify your organization’s retention policy before proceeding.
A Smarter Way to Start Fresh
A clean inbox gives you mental clarity and better control over your email. When you’re not scanning through thousands of irrelevant messages, you can focus on communications that actually matter.
Open your email provider’s web interface in a desktop browser right now. Mobile apps work for small-scale cleanup, but clearing thousands of messages requires the full functionality available in Gmail or Outlook’s browser versions. Select all emails using the bulk selection method for your provider, delete them, and start with a clean slate. Then spend 10 minutes unsubscribing from newsletters you don’t want so your inbox stays manageable going forward.
If you manage email campaigns or lead databases, keeping your contact lists clean is just as important as organizing your personal inbox. Understanding email sender reputation and learning how to improve sender reputation helps your business emails reach inboxes reliably. When you’re ready to send mass email in Gmail or through other platforms, clean your email list first to avoid deliverability problems.
The importance of email verification applies to both receiving and sending email. Use DeBounce to verify addresses before adding them to your database so you’re only communicating with real, active contacts, not collecting addresses that will clutter your systems later.