
When comparing dedicated vs. shared IP for email, the differences show up in the control you have, how quickly you can send, and...
Key Takeaways
- Microsoft 365 DKIM uses two CNAME records (selector1 and selector2) that point to Microsoft-generated keys. This dual-selector setup enables automatic key rotation for stronger security.
- Setup happens across three locations: the Microsoft Defender portal (to generate the record values), your domain’s DNS provider (to publish the records), and back to the Defender portal (to enable signing).
- DNS propagation takes anywhere from a few minutes to 48 hours. The DKIM signing toggle cannot be enabled until Microsoft detects the published records.
- DKIM only works as part of a complete email authentication setup. Pair it with SPF and DMARC for full inbox protection.
Since February 2024, Gmail’s bulk sender requirements have mandated DKIM authentication for any domain sending more than 5,000 emails per day to Gmail users. Yahoo follows the same rule in its sender best practices. Current email spam statistics show just how aggressively major providers now filter unauthenticated mail, which means Microsoft 365 tenants that don’t have DKIM enabled are quietly losing inbox placement at the two biggest mailbox providers in the world.
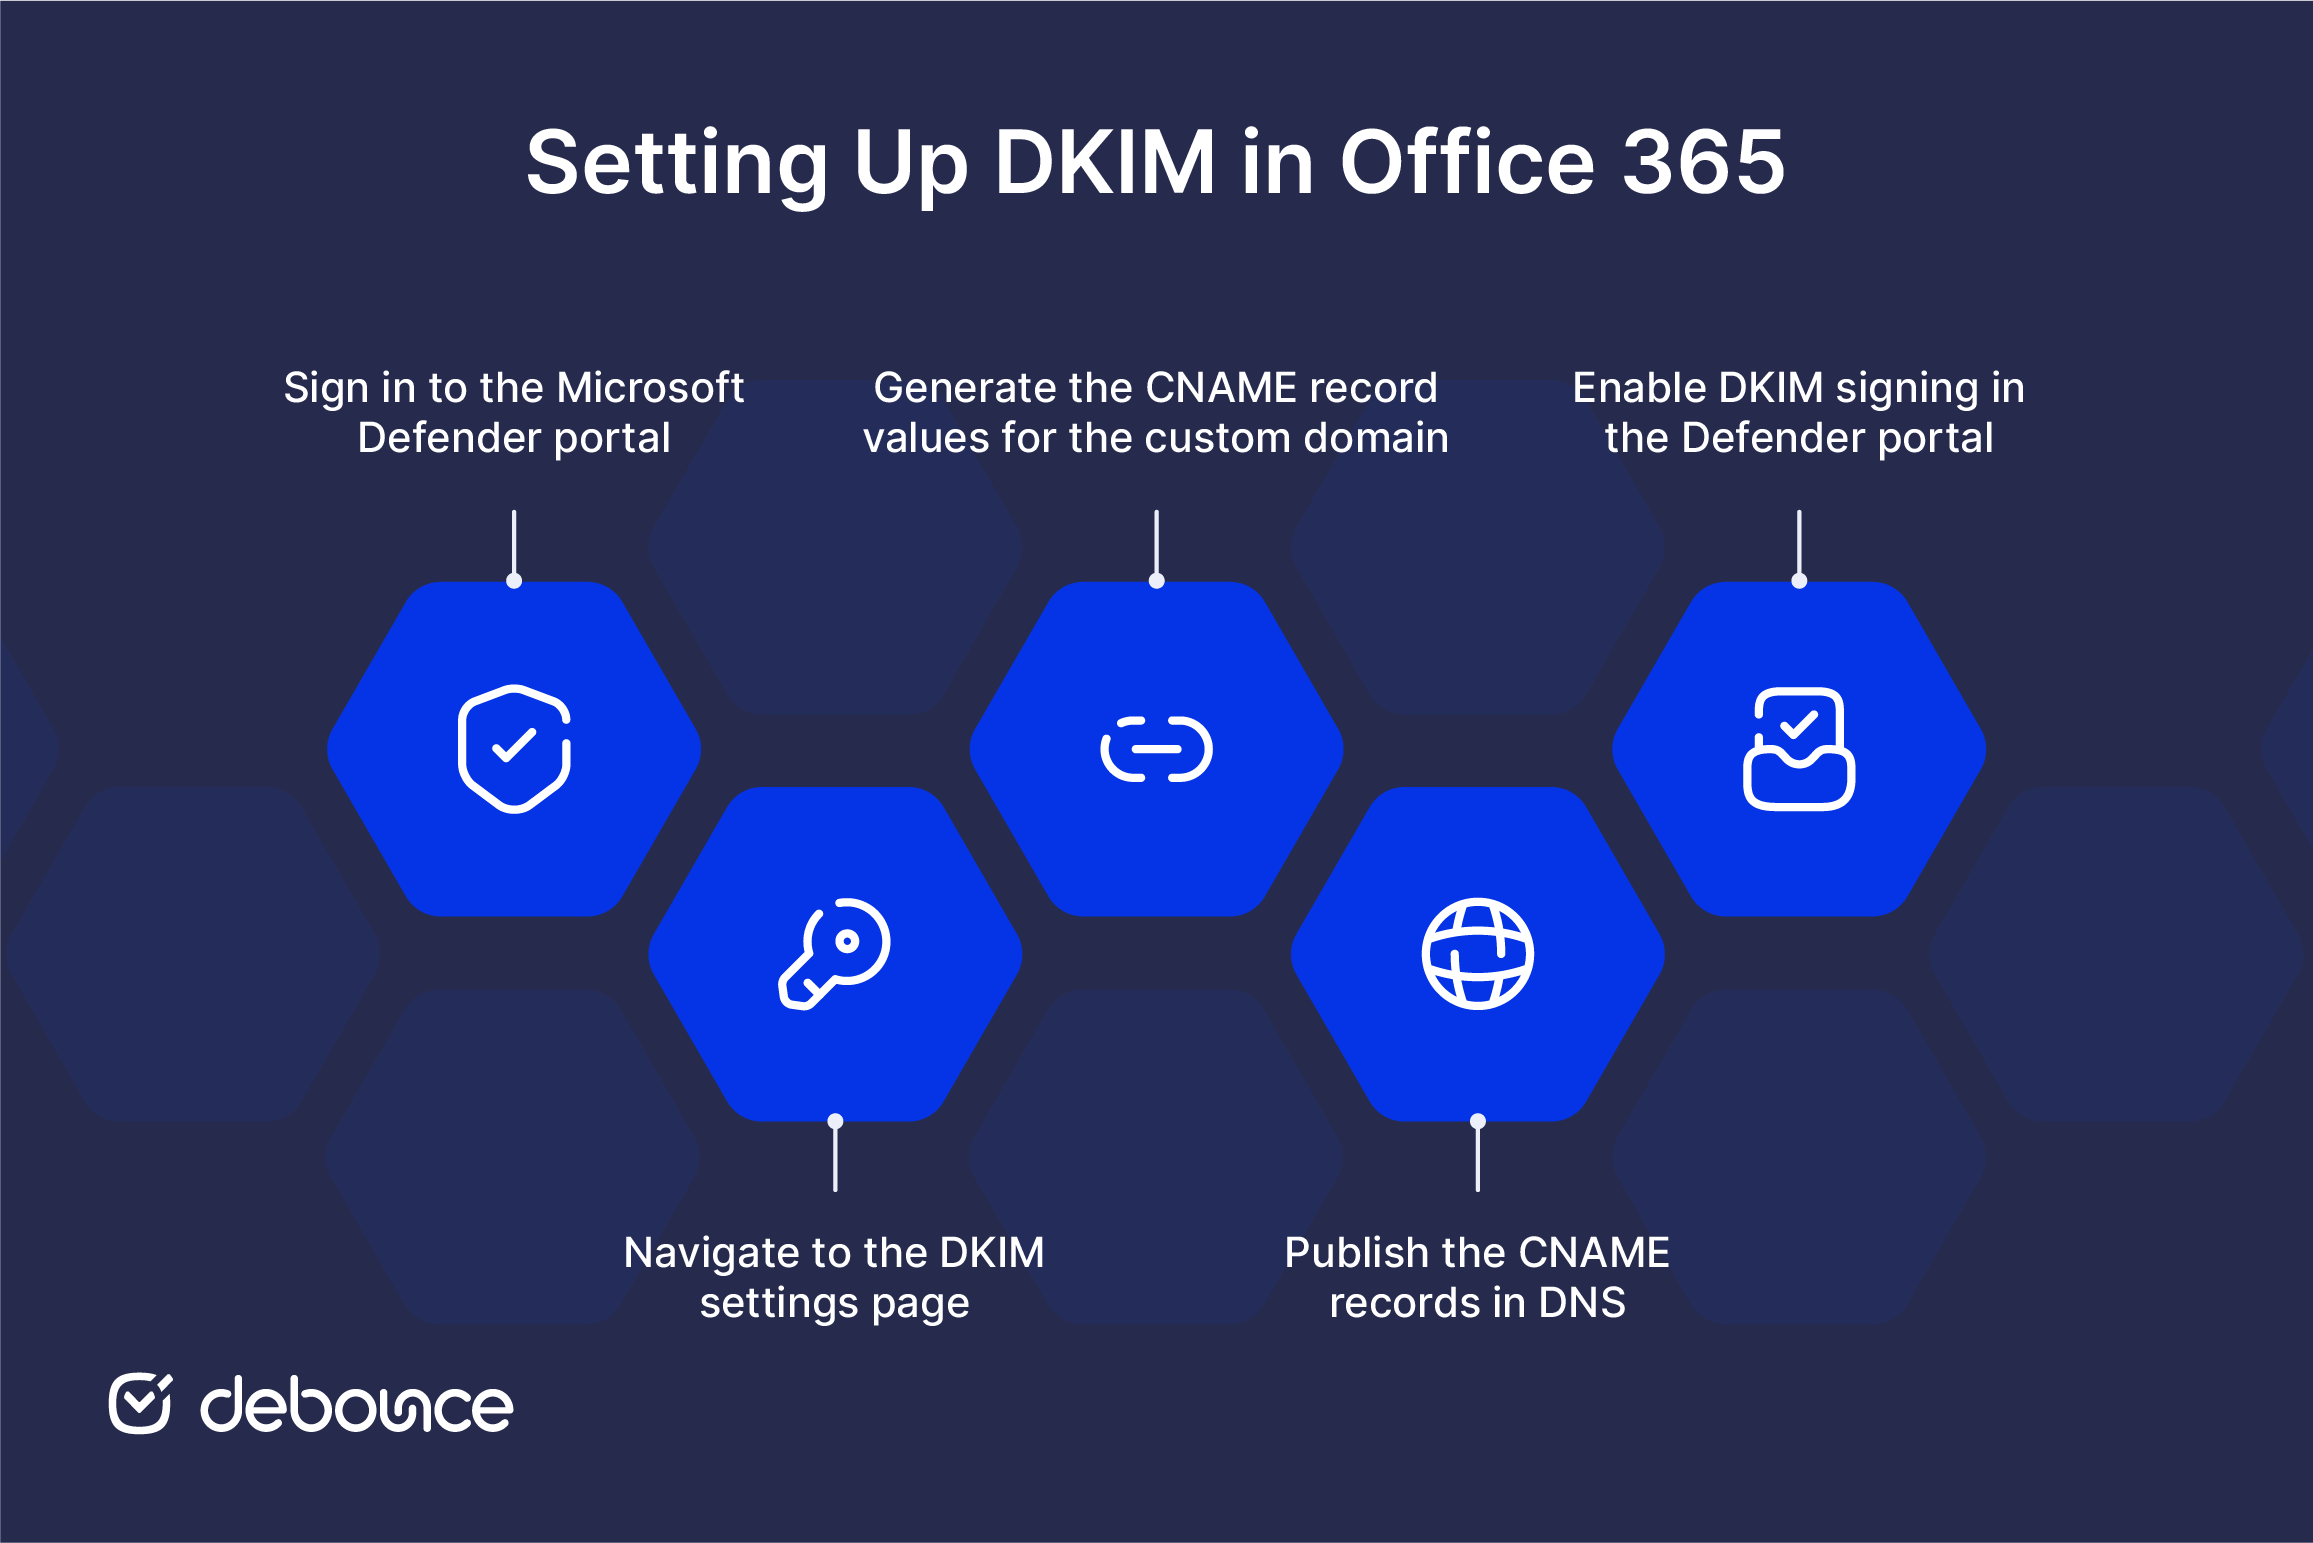
The good news is that setting up DKIM in Office 365 is a pretty straightforward process once you know where to look: open the Defender portal, generate the CNAME records, publish them in DNS, enable signing, and then verify that the setup is actually working.
Prerequisites Before Setting Up DKIM in Office 365

Apart from misconfigured records, many DKIM setup failures come down to a missed prerequisite. Microsoft expects your domain to be verified in Microsoft 365 before you start configuring DKIM. If the domain has not been verified, it will not appear on the DKIM settings page at all.
Before you begin, confirm all four prerequisites are in place:
- Global Administrator or Security Administrator access: The DKIM settings page is not available to standard users or read-only admins. A Security Administrator can view the page, but only a Global Administrator can enable DKIM signing.
- A verified custom domain in Microsoft 365: Open the Microsoft 365 admin center, go to Settings → Domains, and confirm that the domain is marked as verified. Unverified domains do not appear in the Defender portal DKIM list.
- Access to the domain’s DNS settings: You will need to publish two CNAME records with the DNS provider that manages your domain, such as GoDaddy, Cloudflare, Namecheap, AWS Route 53, or another DNS host.
- An SPF record published for the same domain: SPF is not technically required before DKIM, but Microsoft recommends configuring both together. If SPF is not in place yet, set it up before continuing with DKIM.
How to Set Up DKIM in Office 365: Step by Step
The five steps below take 10–15 minutes of active work, plus DNS propagation time ranging from a few minutes to 48 hours. The total time before DKIM signing is live depends almost entirely on how quickly your DNS provider propagates changes.
Microsoft’s Defender portal UI changes regularly. The navigation paths below are accurate at the time of writing, but always confirm against the live portal if something looks different.
Step 1: Sign in to the Microsoft Defender portal
Go to security.microsoft.com and sign in with a Global Administrator account for the tenant. Once signed in, confirm you’re in the correct tenant by checking the tenant name displayed in the top-right corner of the portal. It’s easy to be in the wrong tenant if you manage multiple Microsoft 365 organizations.
Step 2: Navigate to the DKIM settings page
Follow this navigation path from the left menu:
Email & collaboration → Policies & rules → Threat policies → Email authentication settings → DKIM
If the path above doesn’t match what you see, use the portal’s search bar and type “DKIM.” The DKIM page surfaces directly from search regardless of where it’s currently nested in the navigation.
Once you’re on the DKIM page, you’ll see a list of domains. This includes the default .onmicrosoft.com domain Microsoft assigns to every tenant, plus any custom domains that have been verified. Custom domains appear here only after completing the verification process in the admin center.
Step 3: Generate the CNAME record values for the custom domain
Select your custom domain from the list (not the .onmicrosoft.com default). Click “Create DKIM keys.”
Microsoft generates two CNAME record values. These are the records you’ll publish in your DNS zone in the next step. The two records use selector1._domainkey and selector2._domainkey as their host names. Using two selectors is how Microsoft rotates DKIM keys automatically in the background. When Microsoft rotates to a new key, it switches between the two selectors without any action required from you.
Copy both CNAME values exactly as displayed in the portal. Typos in CNAME values are often the cause of DKIM setup failure. Copy the values into a text file before moving to the next step so you have them ready to paste.
Step 4: Publish the CNAME records in DNS
Log in to your domain’s DNS provider and open the DNS management panel for your custom domain. Create two new CNAME records with the following values:
Record 1:
- Host / Name: selector1._domainkey
- Value / Points to: the first CNAME value copied from the Defender portal
- TTL: 3600 (or your provider’s default)
Record 2:
- Host / Name: selector2._domainkey
- Value / Points to: the second CNAME value copied from the Defender portal
- TTL: 3600 (or your provider’s default)
Some DNS providers ask for the full host name, including the domain (e.g., selector1._domainkey.yourdomain.com), while others expect just the prefix (selector1._domainkey). Check your provider’s documentation if you’re unsure. Entering the full name when only the prefix is needed creates a duplicate that won’t resolve correctly.
Save both records and wait. Propagation typically completes within a few hours.
Step 5: Enable DKIM signing in the Defender portal
Return to the Defender portal DKIM page: Email & collaboration → Policies & rules → Threat policies → Email authentication settings → DKIM.
Select the same custom domain you configured in Step 4. Toggle “Sign messages for this domain with DKIM signatures” to On.
If the toggle returns an error like “CNAME record does not exist for this config”, the DNS records haven’t propagated to Microsoft’s servers yet. This is expected. Wait 1–24 hours and try again. Don’t attempt to recreate the CNAME records; they’re likely correct and just need more time to propagate.
Once the toggle is successfully enabled, Microsoft 365 starts signing every outbound email from the custom domain with a DKIM signature immediately.
How to Verify DKIM Is Working in Office 365
Enabling DKIM in the portal does not always mean it is working correctly in live email. Use two verification methods together to confirm that the setup is correct.
External lookup
Go to MXToolbox’s DKIM lookup tool. Enter your domain and selector1 as the selector. A successful result shows the public key Microsoft published and confirms DNS propagation completed. Repeat with selector2 to confirm both selectors are resolving.
Email header inspection
Send a test email from the custom domain to an external mailbox (Gmail, Yahoo, or a personal Outlook address). Open the email and view the full message headers.
- In Gmail: three-dot menu → “Show original.” In Outlook web: three-dot menu → “View” → “View message source.”
- In the Authentication-Results header, a successful DKIM signing shows: dkim=pass [email protected]
The domain in the header.i= value should match your sending domain. If the header shows dkim=none or dkim=fail, the setup isn’t working; check the troubleshooting section below.
Common DKIM Setup Errors in Office 365 and How to Fix Them
The errors below cover the majority of DKIM setup failures in Microsoft 365 tenants.
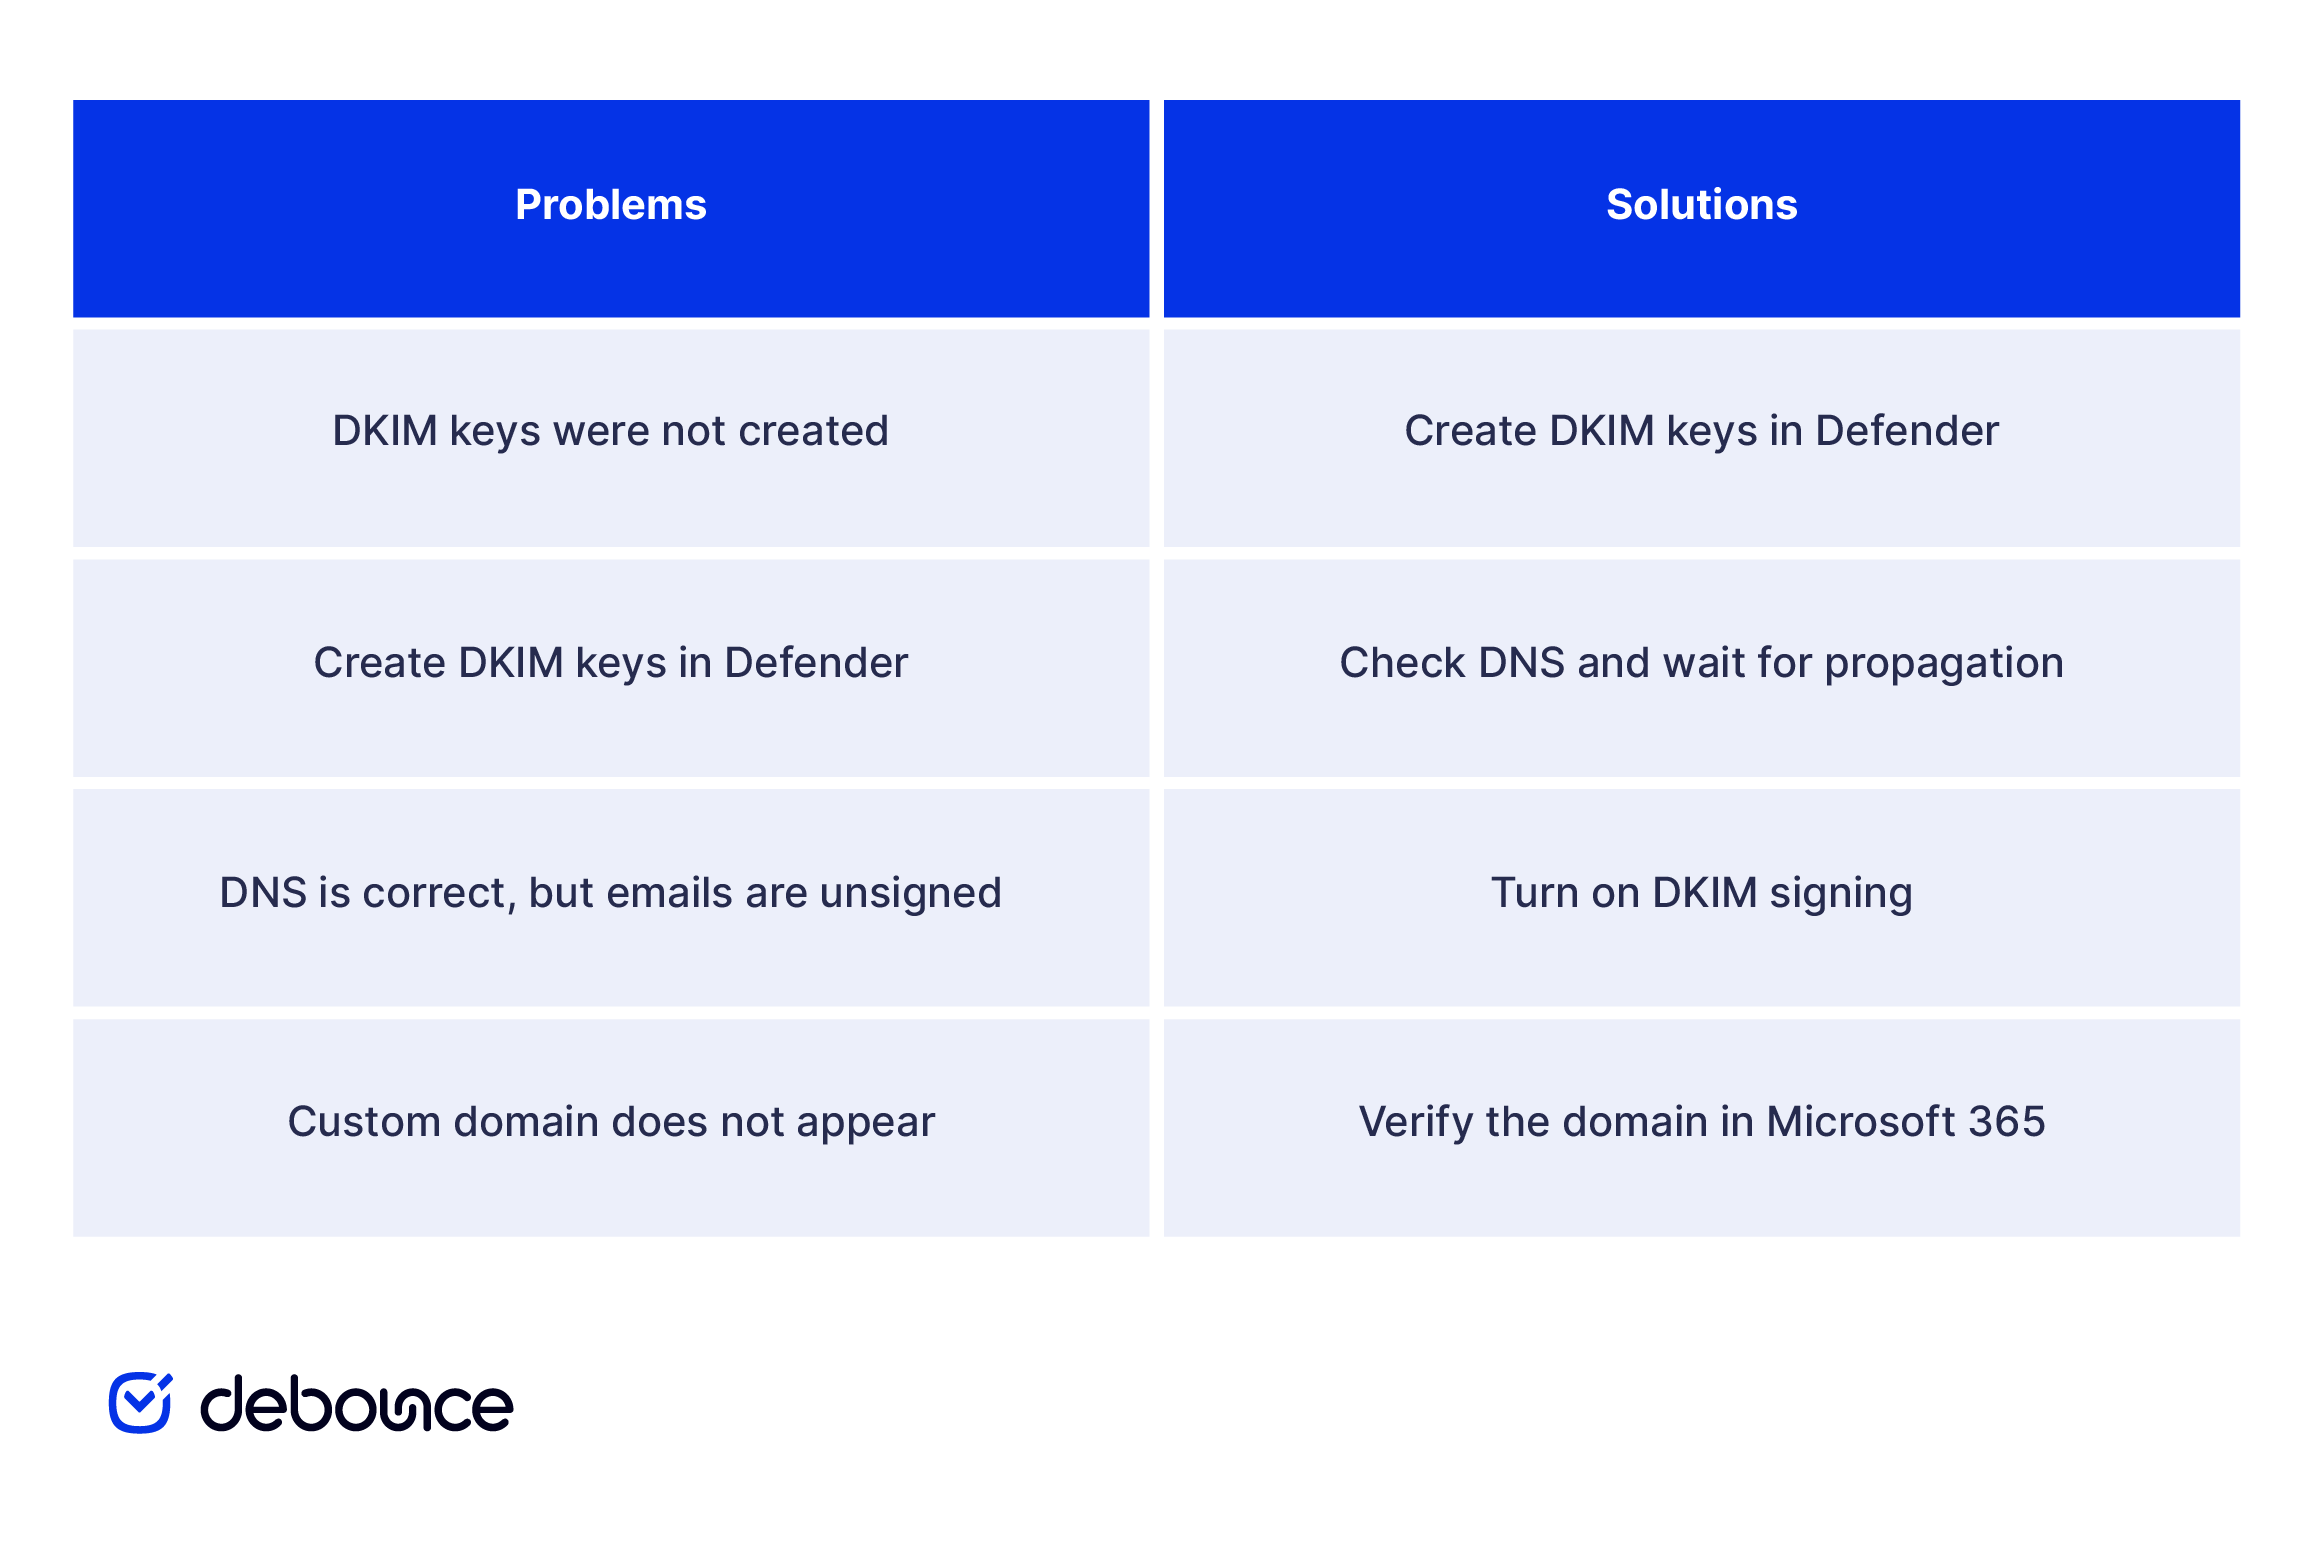
“No DKIM keys saved for this domain”
Diagnose: DKIM keys have not been generated for the domain yet. The toggle to enable signing only appears after keys exist.
Fix: Select the domain on the Defender portal DKIM page and click “Create DKIM keys.” The portal generates the two CNAME values you need to publish. If you’ve already done this in a previous session, the keys should already exist (check whether you’re on the correct domain in the list).
“CNAME record does not exist for this config”
Diagnose: The DNS records either haven’t been published yet or haven’t propagated to Microsoft’s detection systems.
Fix: Confirm the CNAME records are publicly visible by running a DNS lookup with MXToolbox or DNS Checker using selector1._domainkey.yourdomain.com as the query. If the records show up externally but the portal still shows the error, wait 1–24 hours for Microsoft’s servers to pick them up. If the records don’t show up externally, return to your DNS provider and check the host name and value fields for typos, particularly whether the host name includes or excludes the root domain.
DKIM passes on MXToolbox, but Gmail shows dkim=none
Diagnose: The DKIM record is published correctly in DNS, but Microsoft 365 isn’t actually signing outgoing messages because the signing toggle is still off.
Fix: Return to the Defender portal DKIM page and confirm the “Sign messages for this domain with DKIM signatures” toggle is On for the custom domain. It’s possible the toggle was never enabled, or that it reverted due to a portal session issue. Toggle it on and send another test email to verify.
Custom domain not appearing in the DKIM settings page
Diagnose: The domain hasn’t completed the verification process in the Microsoft 365 admin center, so it’s not recognized as a valid domain for the tenant.
Fix: Open admin.microsoft.com, navigate to Settings → Domains, and complete the domain verification process. This involves adding a TXT record to DNS to prove ownership. Once the domain shows as verified in the admin center, it appears in the Defender portal DKIM page within a few minutes.
Pairing DKIM with SPF and DMARC for Full Email Authentication
DKIM alone isn’t enough. Modern mailbox providers expect all three authentication protocols to be in place, and under Gmail and Yahoo’s 2024 bulk sender rules, all three are effectively required for any domain sending over 5,000 emails per day.
Here’s how the three protocols divide the authentication work:
- SPF publishes a list of IP addresses authorized to send email on behalf of the domain. It prevents unauthorized servers from sending mail that claims to be from you.
- DKIM adds a cryptographic signature to every outgoing email. Receiving servers verify the signature against the public key in DNS to confirm the message wasn’t altered in transit.
- DMARC tells receiving mail servers what to do when SPF or DKIM fails: quarantine the message, reject it, or deliver it anyway and report the result.
Without DMARC, a message that fails SPF and DKIM may still reach the inbox because there’s no policy instructing the receiver to act on the failure. Full inbox protection requires all three working together.
Once DKIM and SPF are both verified as working, publish a DMARC record at _dmarc.yourdomain.com. Start with p=none to collect aggregate reports for 2–4 weeks, move to p=quarantine once alignment is stable, then advance to p=reject for full enforcement. That progression is how you improve sender reputation through authentication without risking legitimate mail along the way.
However, authentication doesn’t address bounces from invalid addresses. While DKIM confirms an email came from your domain, it doesn’t prevent a bounce if the recipient’s mailbox doesn’t exist. Strong email sender reputation depends on both authentication and list quality working together. Tools like DeBounce’s Email List Validation help you remove the addresses most likely to generate bounces and complaints.
Getting DKIM Right Pays Off
DKIM setup in Office 365 involves generating the CNAME records in the Defender portal, publishing them in DNS, waiting for propagation, enabling signing, and verifying through email headers. The active work takes 10–15 minutes. The waiting (for DNS propagation) is the only part you can’t accelerate.
Pair DKIM with SPF, DMARC, and consistent list hygiene to fully protect your deliverability under the authentication requirements that Gmail, Yahoo, and Microsoft now enforce at scale.
Before your next major campaign, validate your sending list with DeBounce. Upload your contacts, remove the addresses flagged as invalid, disposable, or high-risk, and send with the confidence that strong authentication and a clean list together give you the best possible chance of reaching the inbox.