
Email size limits apply to the complete message, including body text, inline images, and all attachments combined. Email encoding (Base64) increases file sizes...
Key Takeaways
- Microsoft SNDS is a free, IP-centric reporting tool that shows your reputation with Outlook, Hotmail, and Live.
- The three filter statuses (Green, Yellow, and Red) give you a fast read on whether Microsoft’s filters are accepting, flagging, or blocking your mail.
- Spam trap hits in SNDS signal that your list contains scraped or aged addresses that need immediate attention.
- SNDS data is your best evidence when submitting a delisting request to Microsoft’s deliverability support team.
- Monitoring SNDS without maintaining a clean list only tells you about problems after they’ve already affected your email sender reputation.
Your campaign metrics look fine, and your authentication is set up. Content is solid, and open rates are reasonable. However, a part of your audience uses Outlook or Hotmail, and for them, your messages are landing in junk.
The problem is happening inside Microsoft’s infrastructure, and you have no visibility into it. You may spend days testing subject lines or adjusting send times before realizing the problem has nothing to do with the content in the first place.
That’s what Microsoft SNDS helps with. It’s a free tool that shows how Microsoft views your sending IP, which is important if you send emails to Outlook, Hotmail, or Live addresses at scale. Understanding this data is the first step toward improving your email deliverability with Microsoft’s ecosystem.
What Is Microsoft SNDS (Smart Network Data Services)?
Microsoft SNDS (Smart Network Data Services) is a free reputation portal that gives sending organizations visibility into how Microsoft views the IPs they send from. It covers Microsoft’s consumer mailbox ecosystem: Outlook.com, Hotmail, Live, and MSN. Given that Outlook represents a large share of global inboxes, understanding how Microsoft filters your emails is essential for any serious sender.
Unlike Google Postmaster Tools, which focuses on domains, SNDS focuses on IP addresses. The data is linked to the specific IP you send from, not your domain. If you use multiple IPs, each one has its own reputation. This matters because your domain can be properly set up with SPF and DKIM, but your emails can still perform poorly if the sending IP has a bad reputation or is shared with other senders who send spam.
This is particularly relevant for marketers using shared sending infrastructure. If your ESP routes your campaigns through shared IPs, your reputation within SNDS is partially shaped by what other senders on those IPs are doing, not just your own behavior. That’s one of the strongest arguments for moving to dedicated IPs once your send volume justifies it, and for monitoring SNDS closely regardless of your infrastructure setup.
It’s important to note that SNDS is a reporting tool, not a whitelist. Registering your IP in SNDS doesn’t automatically improve your deliverability or guarantee inbox placement. What it does is give you accurate, Microsoft-sourced data about your sending behavior (complaint rates, trap hits, and filter outcomes) so you can act on problems.
How to Set Up and Verify Your SNDS Account
Getting access to SNDS requires a Microsoft-associated account and a verification step that confirms you control the IP addresses you want to monitor.
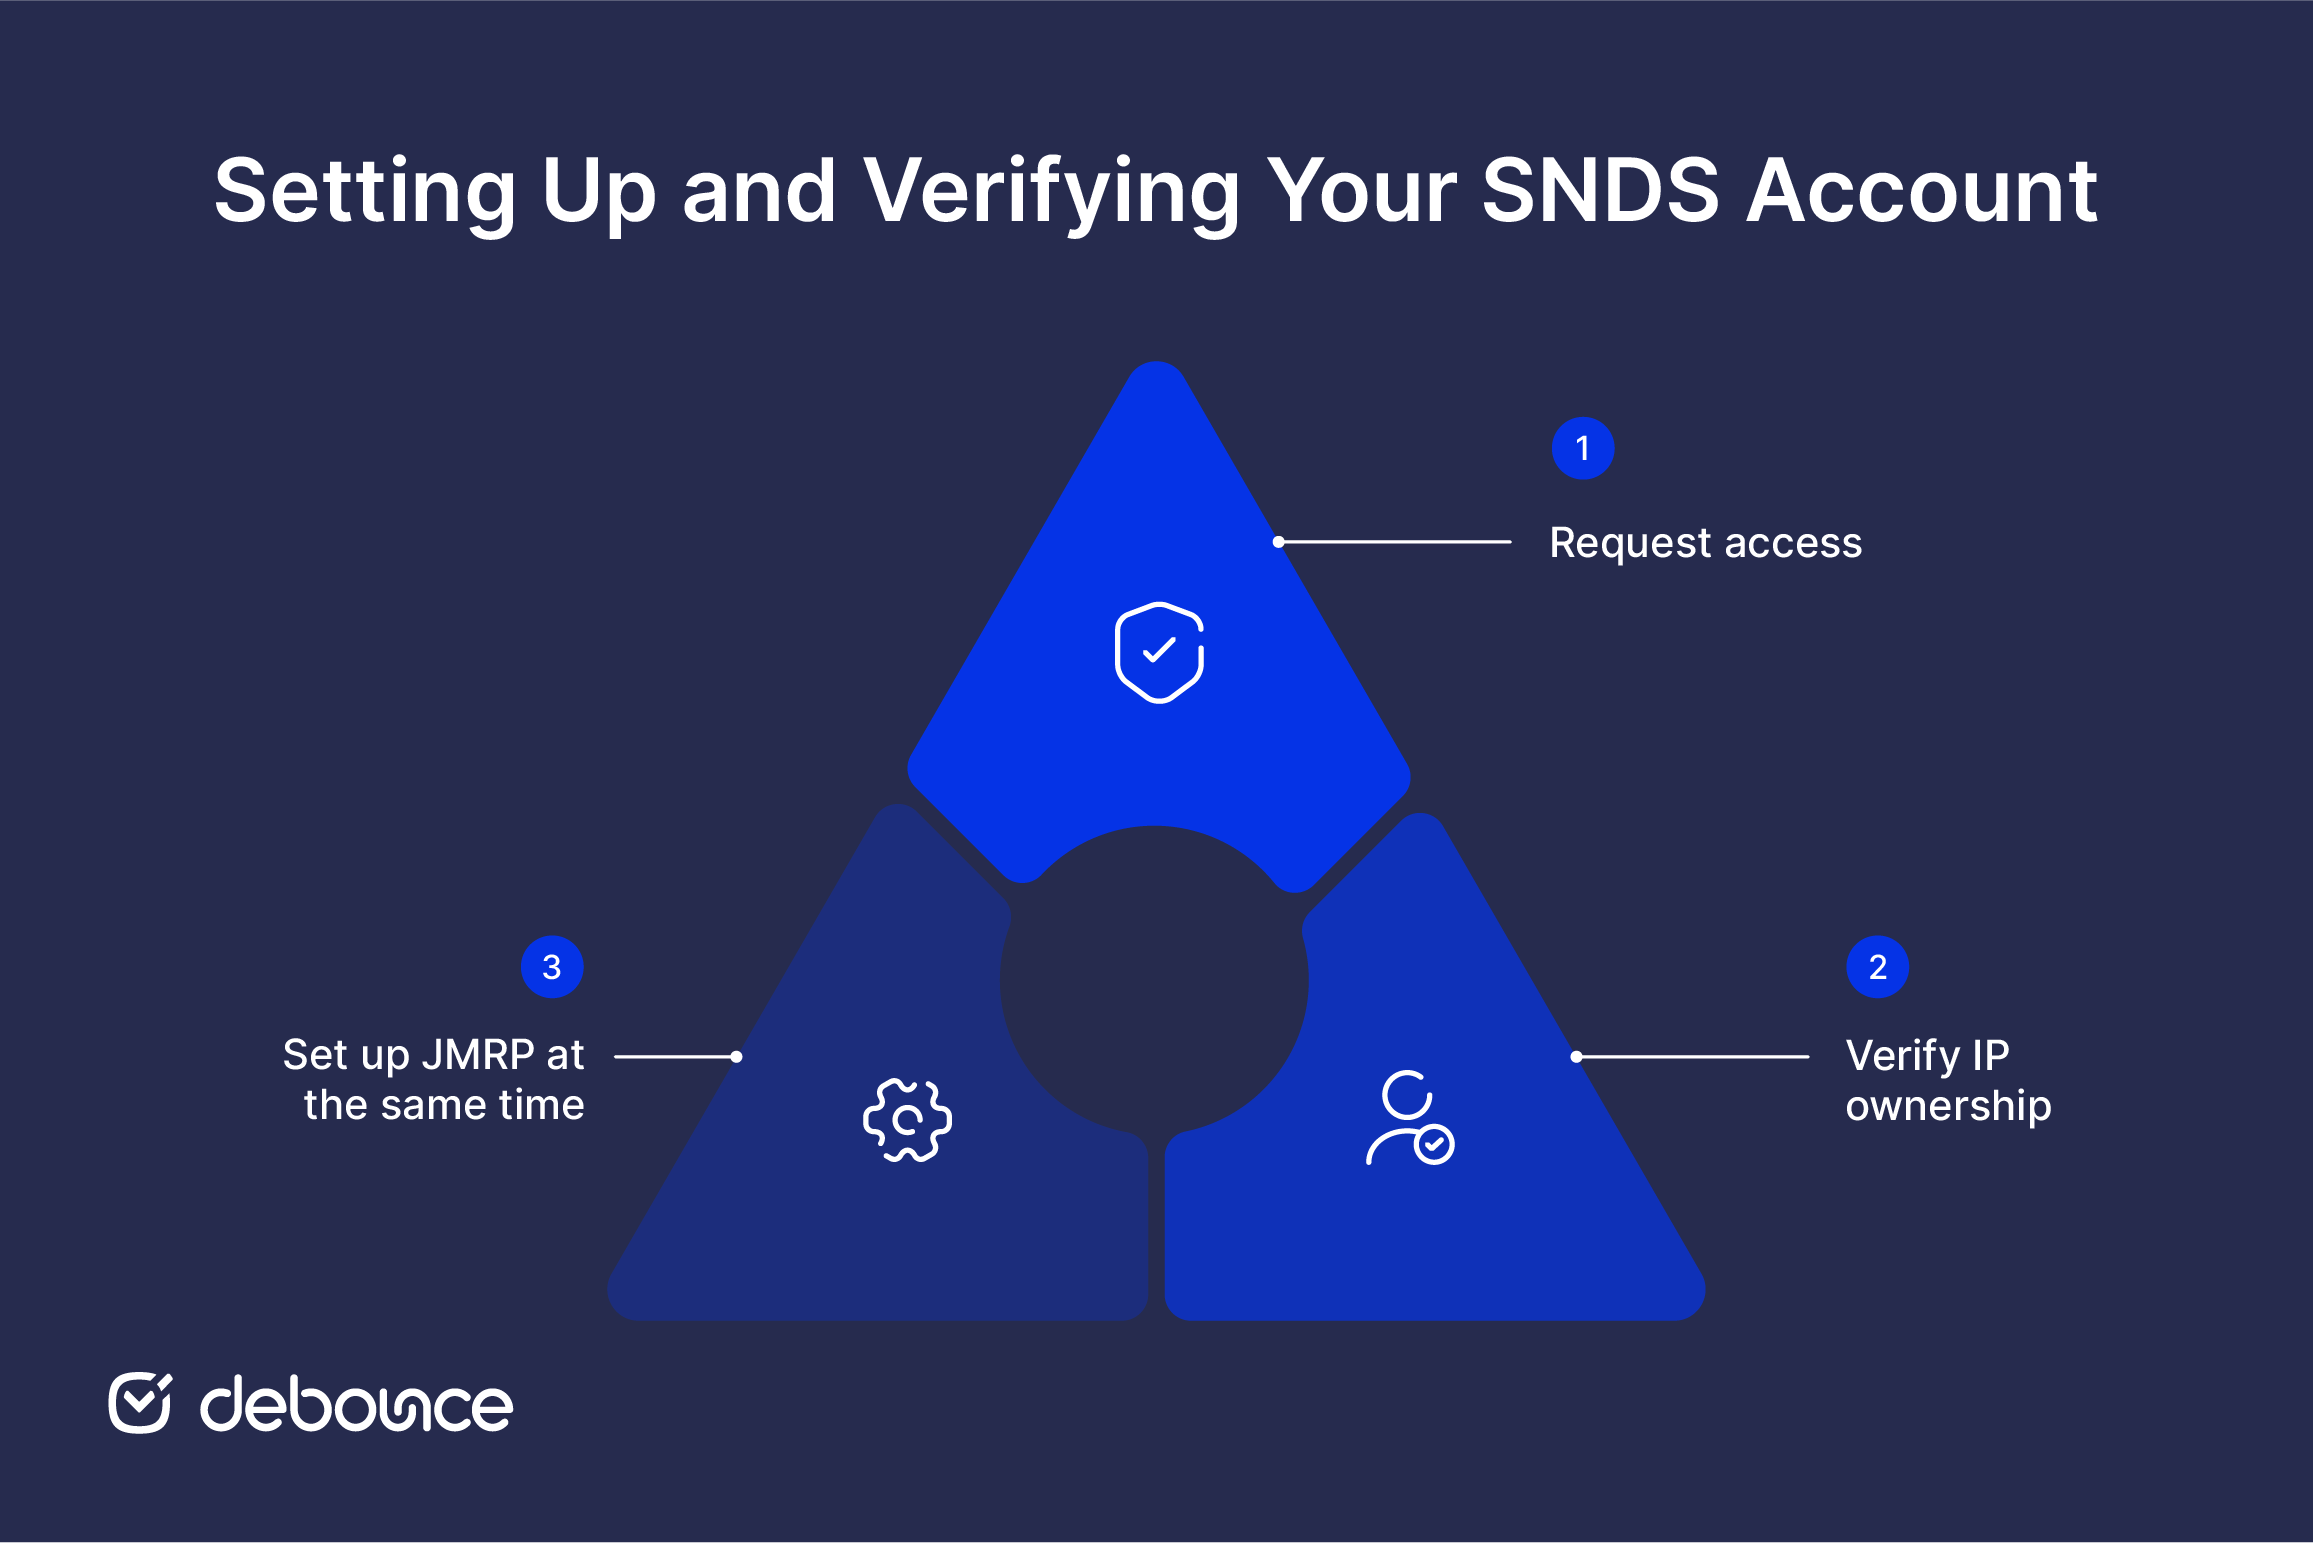
Step 1: Request access
Go to the SNDS portal (postmaster.live.com/snds) and sign in with a Microsoft account. Submit a request for access to your specific IP range. Microsoft reviews these requests before granting access.
Step 2: Verify IP ownership
Microsoft offers two primary verification methods:
- WHOIS-based verification: Microsoft identifies an email address listed in the WHOIS record for your IP range and sends a verification code there.
- Postmaster/abuse alias: If you have a postmaster@ or abuse@ address associated with your sending domain, Microsoft can verify through one of those.
If neither of these options is straightforward for your setup, for example, if your WHOIS data is privacy-protected or your abuse aliases aren’t yet configured, sort those out before attempting to register. Having a working [email protected] address is good operational practice regardless of SNDS, and it’s a requirement for some feedback loops across multiple inbox providers, not just Microsoft.
Step 3: Set up JMRP at the same time
While you’re in the SNDS portal, sign up for the Junk Mail Reporting Program (JMRP). This is Microsoft’s feedback loop: it sends you a copy of complaint reports when recipients mark your messages as junk. JMRP and SNDS work together: SNDS shows your aggregate reputation metrics; JMRP gives you individual complaint signals.
Setting both up at the same time gives you a complete view of how Microsoft handles your emails from the start. If you rely only on SNDS, you see the outcome but not the reason behind it.
Essential Microsoft SNDS Metrics
Once you have access, focus on three key data points in SNDS:
Filter results
The filter result is the headline metric: a color-coded status that summarizes how Microsoft’s spam filters are treating mail from your IP.
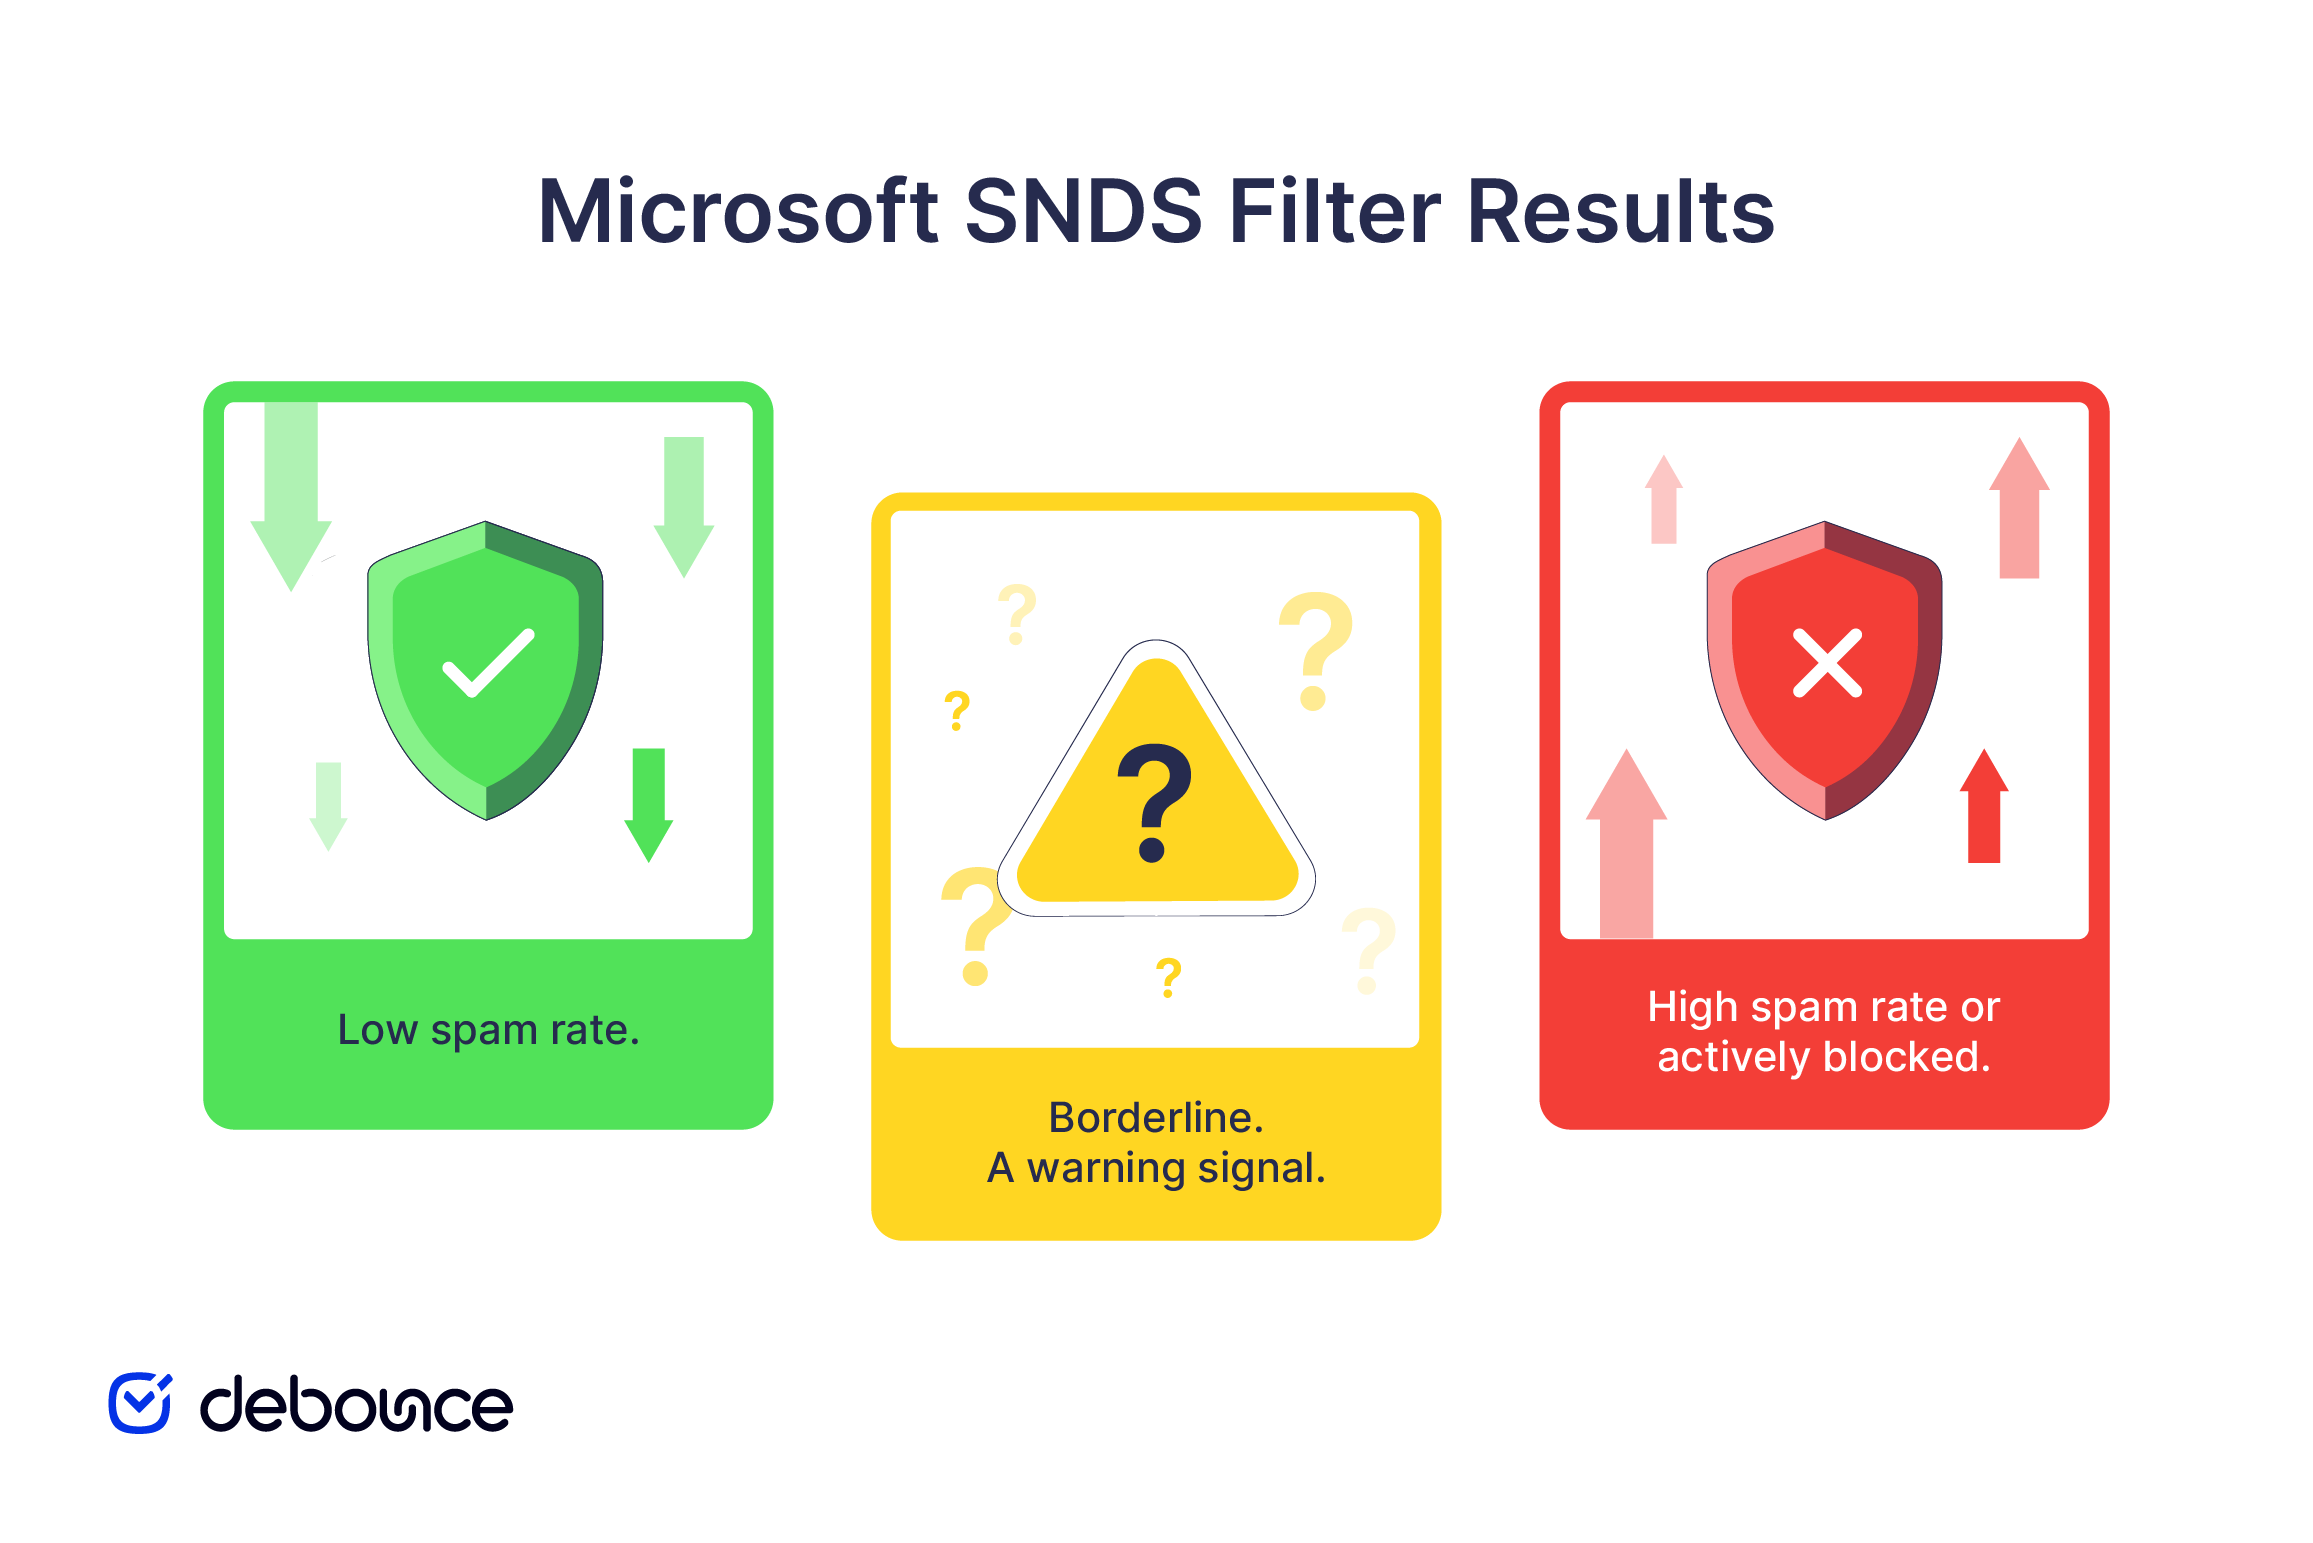
- Green: Low spam rate. Your mail is being delivered normally.
- Yellow: Borderline. Some fraction of your mail is being filtered. This is a warning signal worth investigating promptly.
- Red: High spam rate or actively blocked. Mail from this IP is being rejected or routed to junk at a significant volume.
A Red status on a sending day is a clear sign that something is wrong with the list or sending behavior tied to that IP. In most cases, it means problematic addresses (invalid, inactive, or role-based) made it into your send. Running your list through DeBounce before sending is a practical way to prevent that outcome. Catching those addresses on the way in is easier than repairing reputation after they’ve already triggered filtering.
Don’t treat Yellow as a pass. Yellow status indicates that Microsoft’s filters are already applying heightened scrutiny to your IP. Left unaddressed, Yellow tends to become Red over subsequent sending days, especially if the underlying list quality issue isn’t fixed. Treat it as an early warning and act on it quickly.
Complaint rate
The complaint rate shows the percentage of your delivered messages that recipients marked as junk. Microsoft typically starts flagging issues when this reaches around 0.1%, or about one complaint per 1,000 messages.
A rate above that threshold doesn’t just affect your SNDS status. It also influences how Microsoft treats future emails from your IP, so consistently high complaint rates can quickly damage your reputation.
It’s also important to note that complaints don’t always mean your content is poor. In many cases, they happen because recipients don’t remember signing up or feel they’re receiving too many emails. Both point back to list quality and sending practices (rather than the message itself).
Trap hits
Spam trap hits are one of the more serious signals in SNDS. Microsoft distinguishes between trap types, with pristine traps being the most damaging. Pristine traps are addresses that have never been used for legitimate email: they exist solely to catch senders who are using scraped, purchased, or aged lists.
Recycled traps, on the other hand, are formerly active addresses that have been abandoned, deactivated, and then repurposed as traps. Hitting recycled traps indicates your list contains addresses that were once real but have since gone inactive, which is a common problem with lists that haven’t been verified or re-engaged in a long time.
If you’re seeing pristine trap hits, it means your list includes addresses that were never opted in. The response should be immediate: pause sending from that IP, as well as verify and clean the list. Continuing to send while trap hits are present quickly damages your sender reputation and makes recovery more difficult.
Key Benefits of Monitoring SNDS in 2026
Monitoring SNDS gives you direct insight into how Microsoft evaluates your sending activity over time. Instead of relying on indirect signals or assumptions, you can see what is happening and respond based on clear, reliable data.
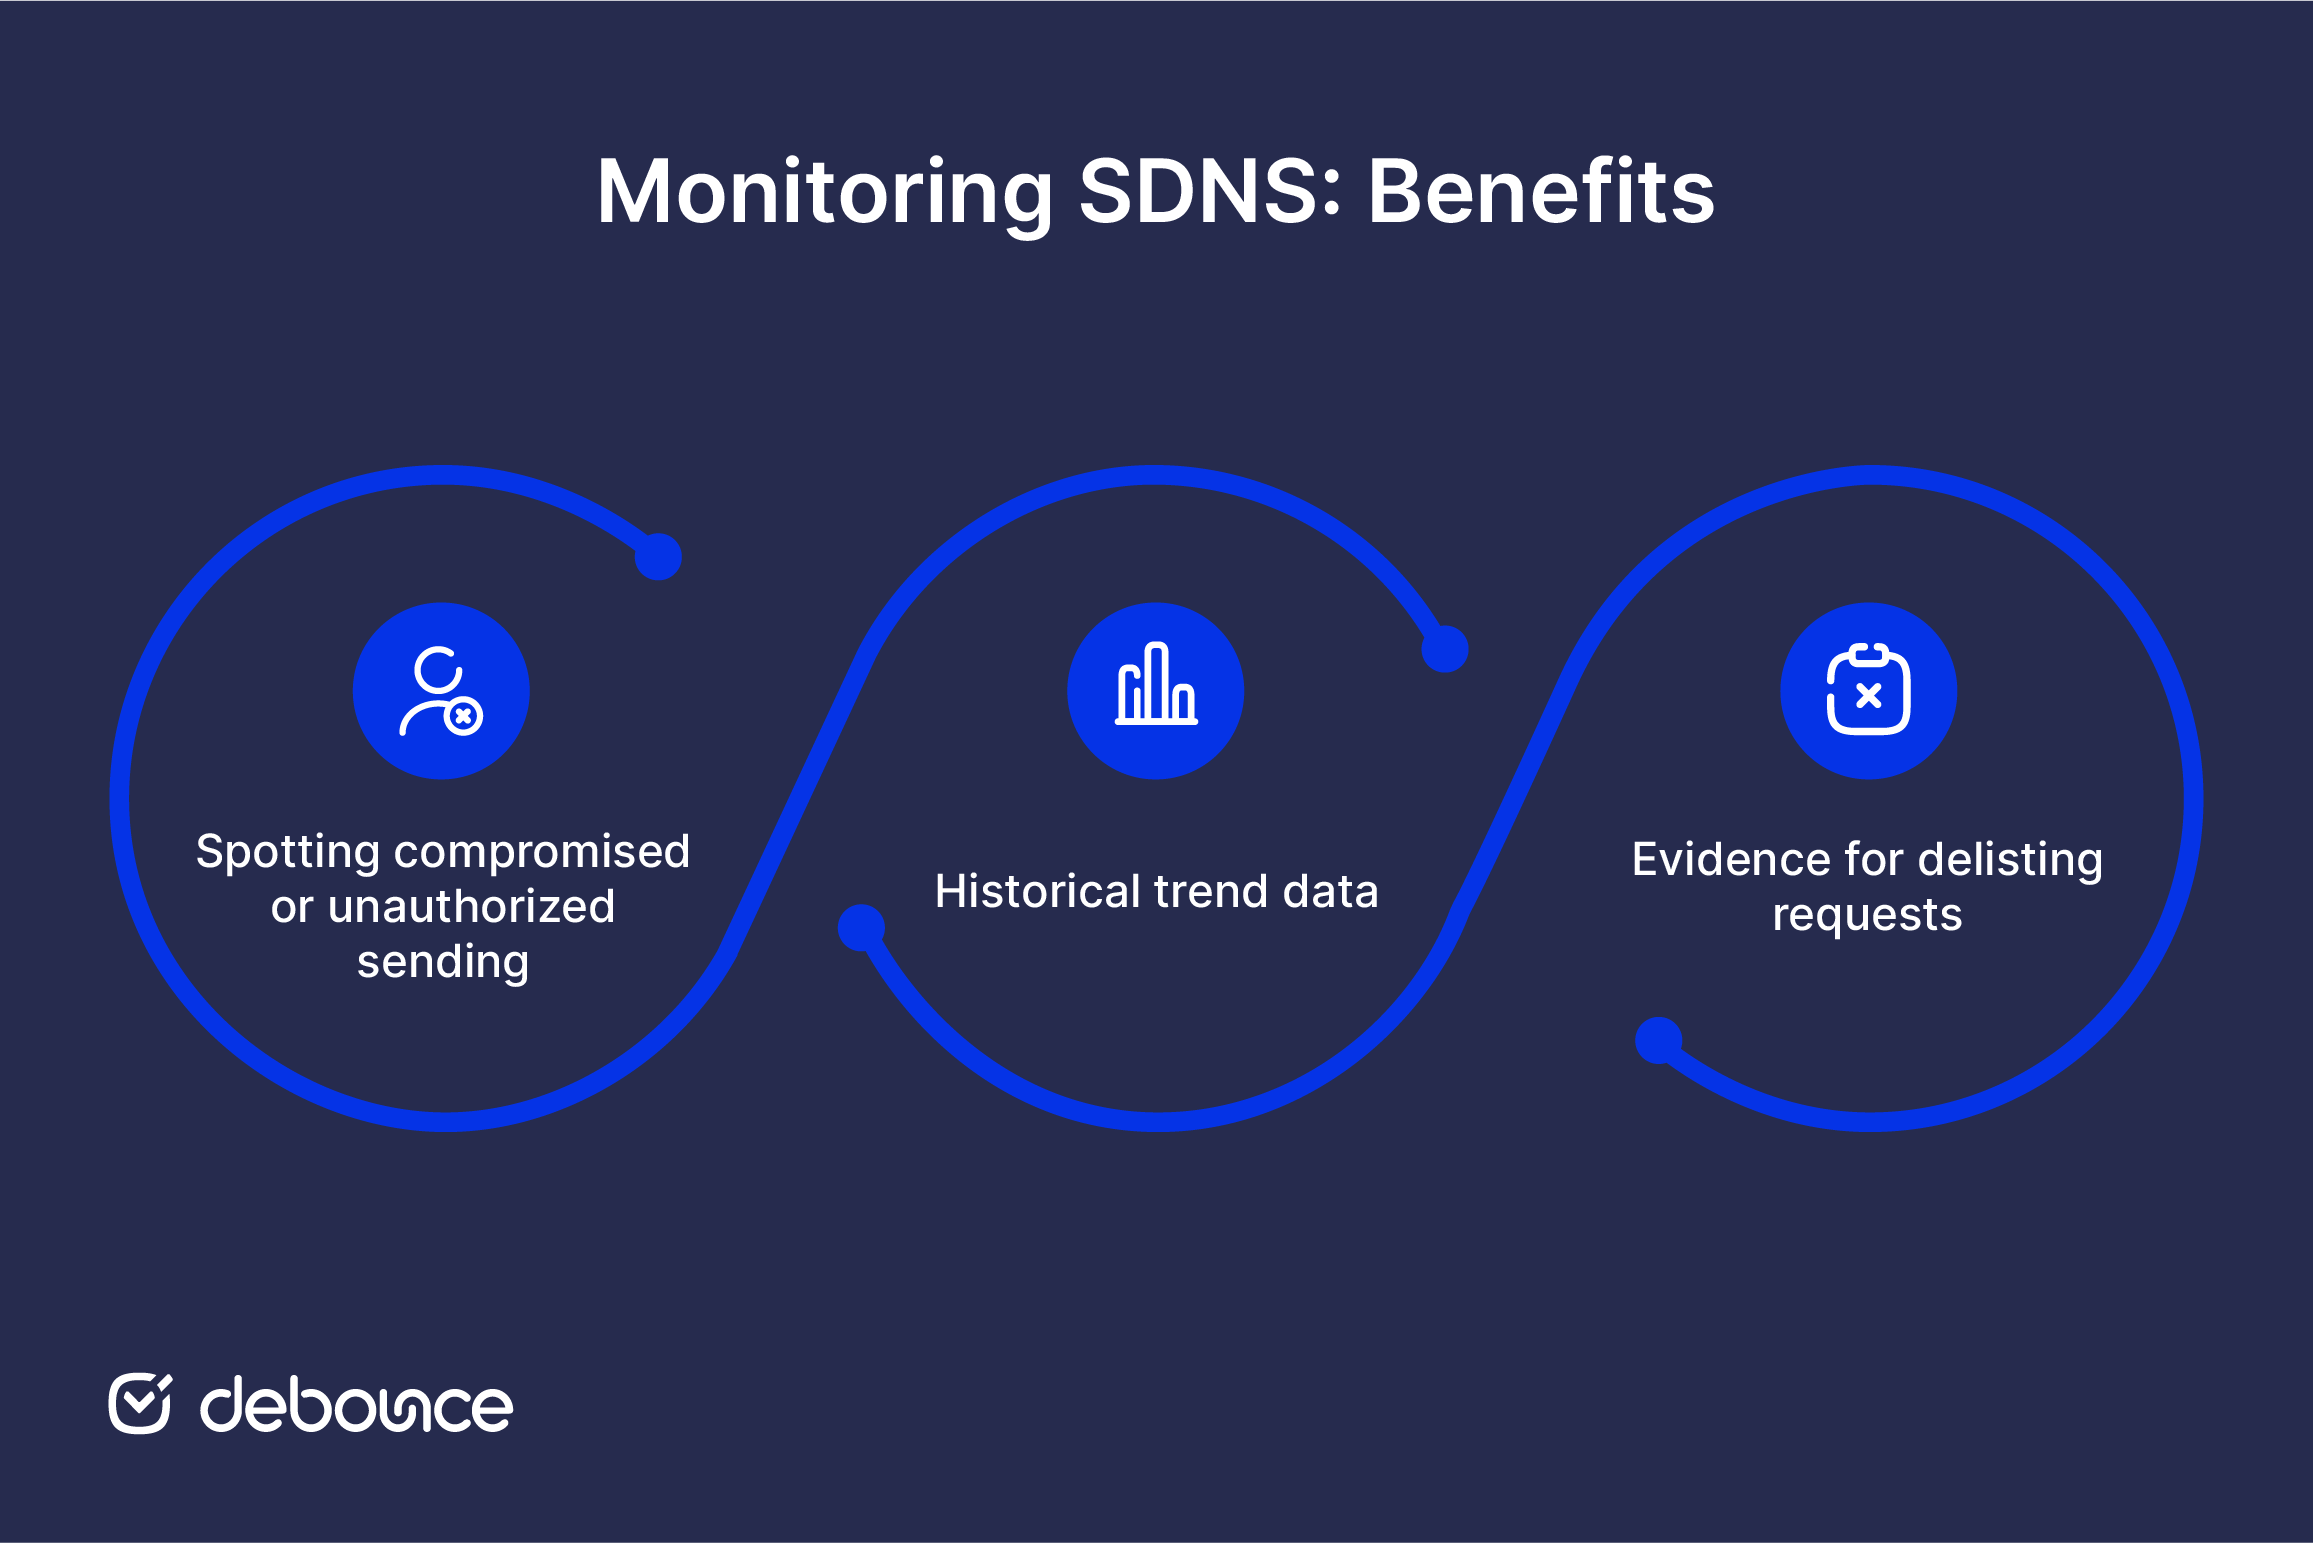
Spotting compromised or unauthorized sending
One of SNDS’s most practical uses is detecting “zombie” IPs (sending infrastructure within your network that has been compromised and is sending spam without your knowledge). If SNDS shows high complaint rates or trap hits on an IP you don’t recognize as active, that’s a signal to investigate at the infrastructure level. For organizations managing large sending environments or shared hosting, this level of visibility is hard to get from any other free tool.
Historical trend data
SNDS provides day-by-day data, not just a current snapshot. You can correlate Red or Yellow status days with specific campaigns, list segments, or IP changes. That historical view makes it much easier to identify the root cause of a reputation problem rather than working from aggregate metrics alone. If you ran a re-engagement campaign on a Tuesday and saw Yellow status appear on Wednesday, SNDS gives you the data to connect those two events and act accordingly.
Evidence for delisting requests
If your IP gets blocked by Microsoft and you need to submit a delisting request through Microsoft’s deliverability support, SNDS data is your evidence. You can demonstrate that complaint rates and trap hits have dropped, show the corrective steps you’ve taken, and give the support team something concrete to evaluate. Without that data, delisting requests are harder to support and take longer to process. Senders who can show a clear downward trend in complaint rates and zero recent trap hits are in a much stronger position than those submitting requests without supporting data.
How to Use SNDS Data to Improve Sender Reputation
SNDS data is most useful when used consistently to spot patterns and guide decisions. Instead of viewing metrics in isolation, connect what SNDS shows with your sending activity, list quality, and infrastructure changes.
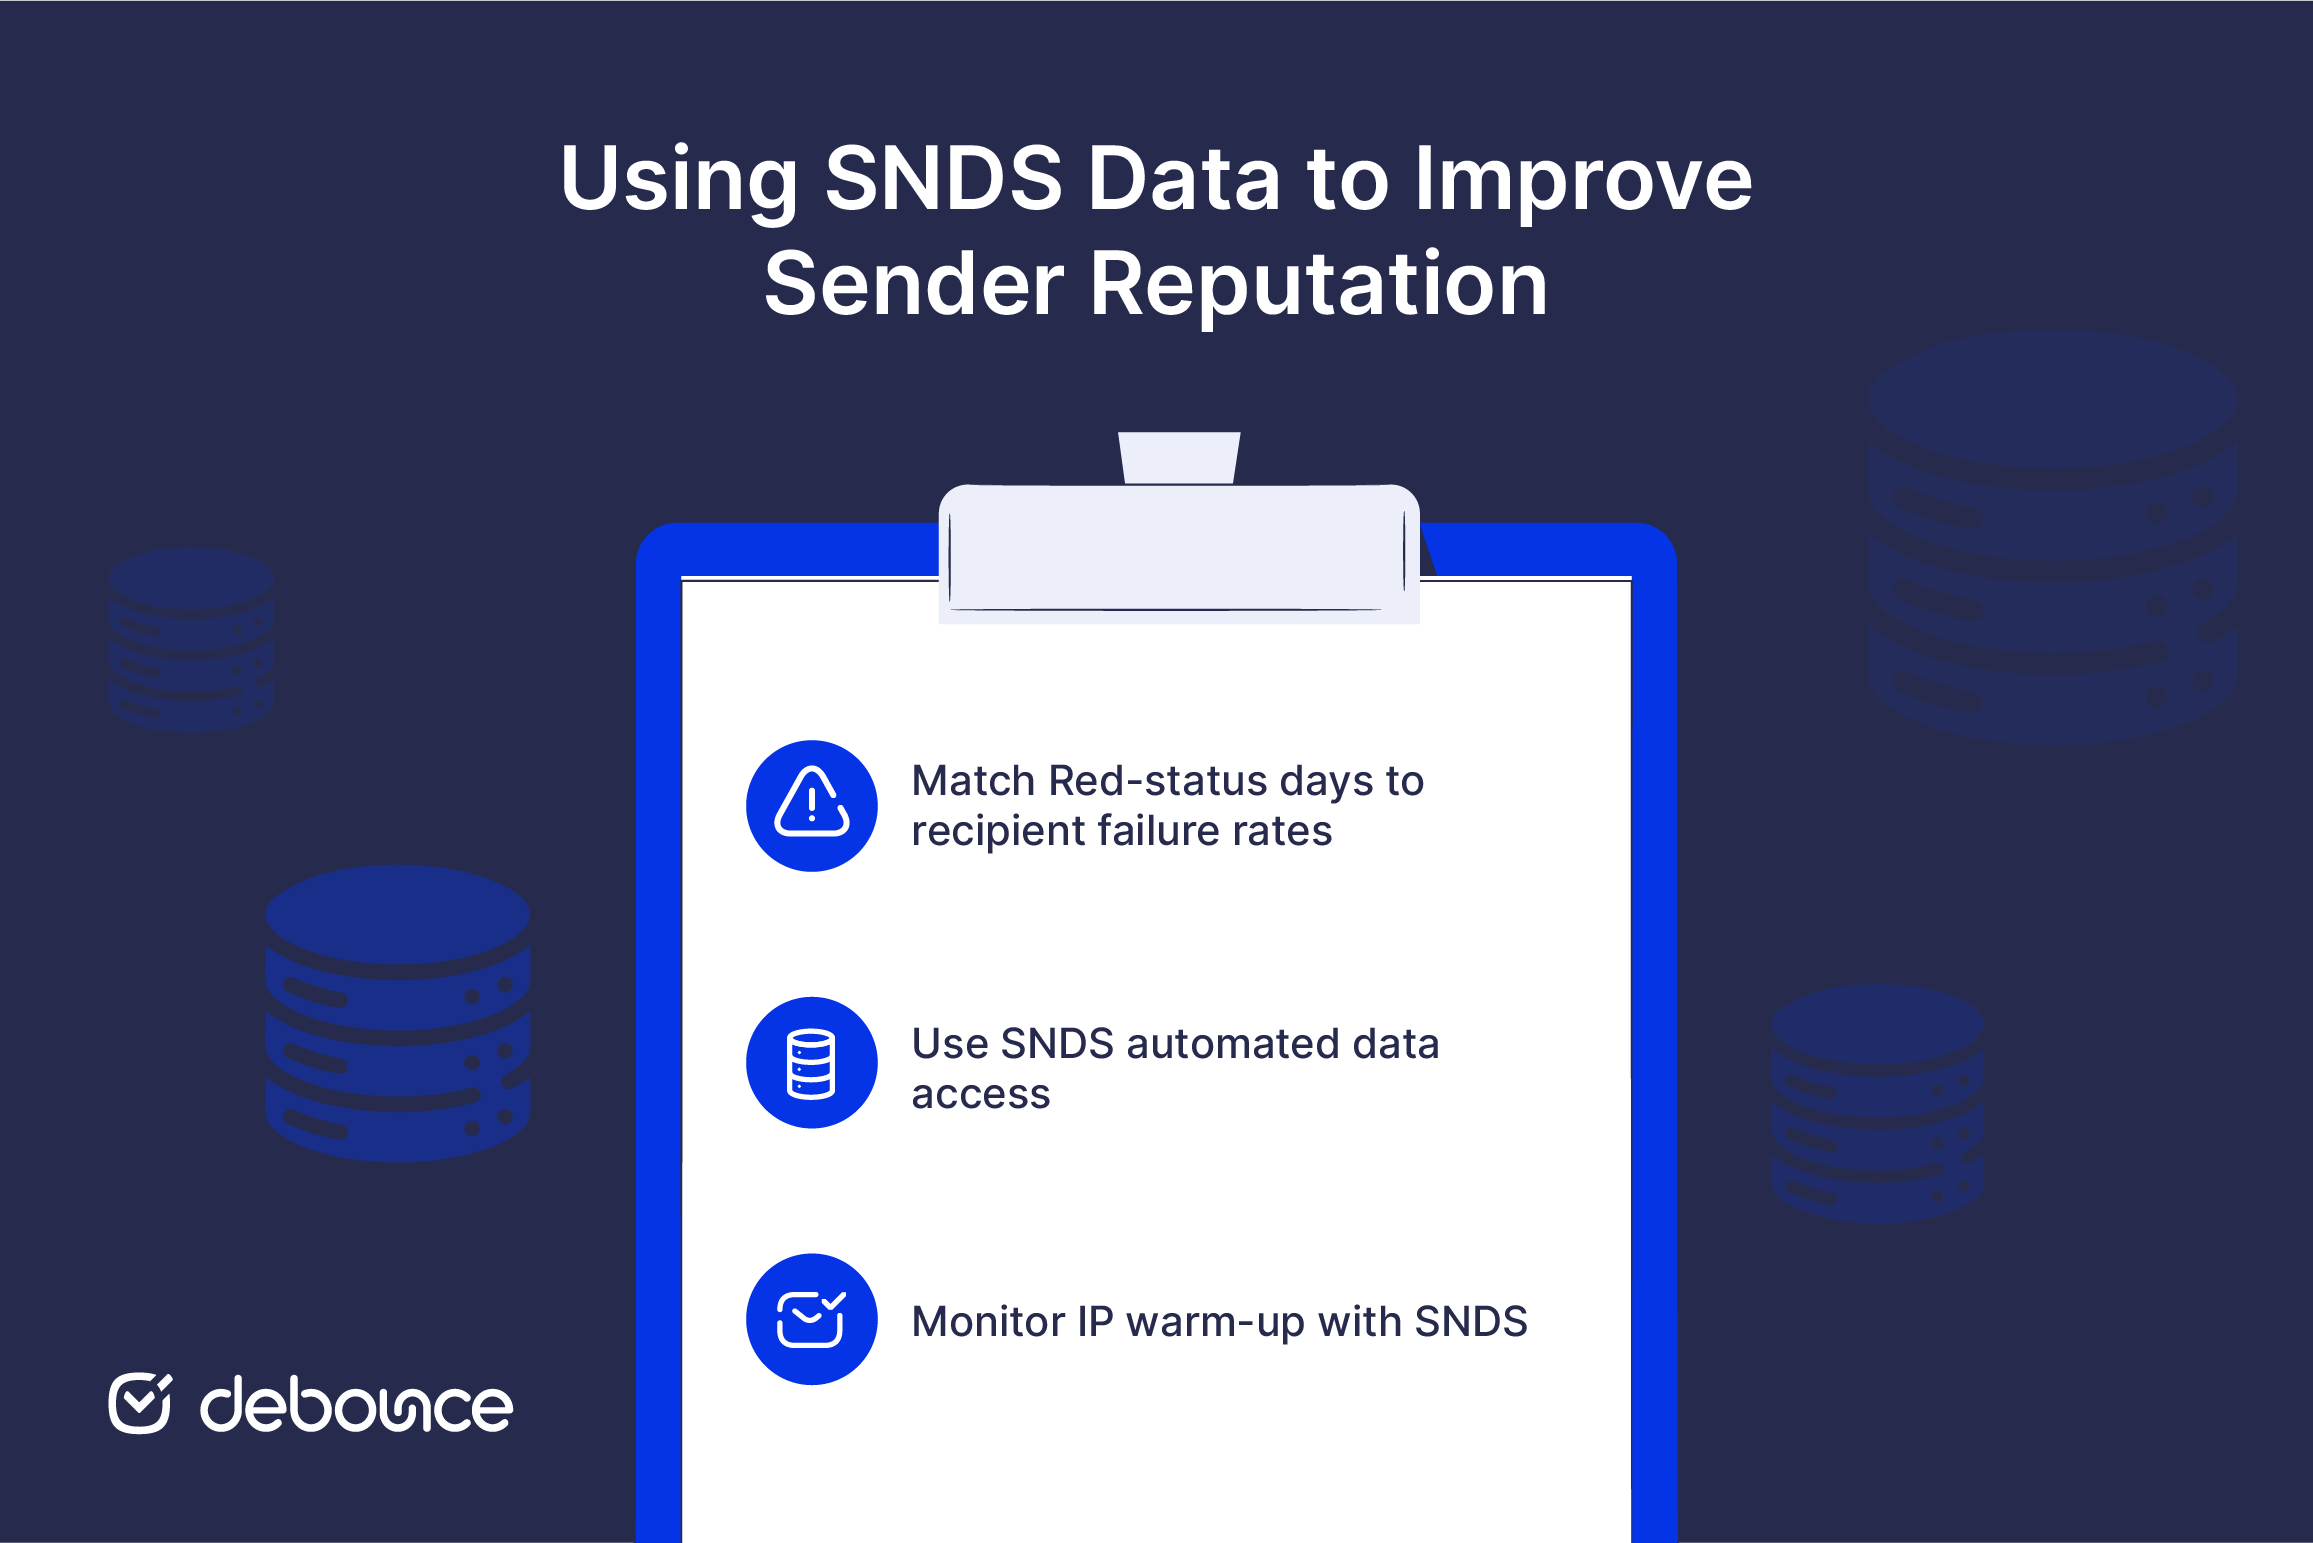
Match Red-status days to recipient failure rates
In SNDS, compare days with poor filter results to your RCPT (recipient) failure counts. If high RCPT failures line up with Red status, it usually points to list quality issues, such as a large number of invalid or inactive addresses. That combination is a strong signal that your list needs cleaning before the next send.
It also helps to review your ESP’s bounce logs alongside SNDS data. This gives a clearer view of which segments are causing the most failures.
Use SNDS automated data access
Rather than logging into the portal manually each day, SNDS offers an automated data access feature that lets you pull metrics programmatically via a request URL. Setting this up means you can monitor your IP reputation in near-real time, integrate SNDS data into your own dashboards, and get faster visibility into changes without manual checks. For teams sending at scale, the setup is worth it. Manual monitoring is easy to skip on busy days, which are often the times when issues matter most.
Monitor IP warm-up with SNDS
If you’re warming up a new IP, SNDS shows how Microsoft responds as your sending volume increases. Start with low volumes, check your filter results each day, and only scale when you see consistent Green status.
Increasing volume too quickly is a common mistake during warm-up. SNDS makes it clear when you’re moving faster than Microsoft’s filters can handle. Consistent Green status over the first few weeks is a strong signal that you can increase volume safely.
Important 2026 Updates and Security Changes
Recent updates to SNDS and related tools change how you access data and manage deliverability. Keeping up with these changes is important to avoid gaps in monitoring and to adjust how you handle list quality.
Migration to the new SNDS portal
Microsoft moved SNDS access into Microsoft’s sender support/postmaster ecosystem. Any saved links to the legacy portal no longer work. Make sure your team uses the correct URL and that any automated scripts have been updated. If your deliverability monitoring setup hasn’t been audited recently, now is the time. Running on broken scripts can leave gaps in your data that you won’t notice until a problem is already serious.
API key rotation requirements
API keys used for SNDS data access may expire on a recurring basis, often around a monthly cycle. If a key expires, your monitoring can stop without warning. Set reminders to renew keys on time or build checks into your workflow to keep monitoring active.
Enhanced privacy redaction in JMRP
Microsoft now redacts the complaining recipient’s email address in JMRP reports. Previously, you could identify which specific addresses were complaining and remove them from your list. That’s no longer possible.
This change shifts how list management works. Complaint-based cleanup is no longer reliable, since the issue is only visible after it affects your metrics. Keeping complaint rates low now depends on proactive list hygiene: cleaning and verifying your list before sending, rather than reacting after complaints appear.
SNDS Monitors Your Health, List Hygiene Keeps You Healthy
Microsoft SNDS acts as a health check for your sending IP with Outlook and Hotmail. It shows how Microsoft’s filters are treating your emails, whether they’re trusted, borderline, or flagged as spam. However, SNDS only shows the outcome. With JMRP now redacting complaint addresses, fixing issues after they happen is no longer reliable. The only consistent approach is to prevent problems before they start by cleaning your list ahead of each major send, removing invalid, disposable, and risky addresses before they trigger complaints or hit spam traps.
Used together, SNDS and regular list validation give you a complete view: SNDS shows how your IP is performing, while validation ensures the data you’re sending to is accurate. Senders who maintain a consistent Green status in SNDS are usually the ones who treat list hygiene as an ongoing process.
Upload your list to DeBounce before your next send. It checks syntax, DNS, MX records, and mailbox existence, so your SNDS filter results stay Green, complaint rates stay low, and Outlook deliverability remains stable. You can use the Email Validation API for real-time checks at signup or run a bulk validation on your existing list. Start with 100 free verifications to see the quality of your data.