Who doesn’t have an email? Almost everyone has. It’s one of the most popular communication channels across the globe. Not only does it let you...
Key Takeaways
- Both SPF and DKIM must be configured and aligned with your sending domain before DMARC works correctly. Publishing DMARC over broken authentication causes legitimate email to be flagged immediately.
- When setting up DMARC in Office 365, start with p=none to collect reports, move to p=quarantine once alignment is stable, then advance to p=reject for full enforcement.
- Microsoft 365 does not configure DMARC for custom domains automatically. The record must be published manually in your domain’s DNS.
Since February 2024, Gmail’s bulk sender requirements have mandated a published DMARC record for every domain sending over 5,000 emails per day to Gmail users. Yahoo enforces the same rule under their sender best practices. As of May 2025, Microsoft has begun rejecting non-compliant mail from high-volume senders to Outlook, Hotmail, and Live mailboxes.
DMARC has moved from optional to required for any Microsoft 365 tenant operating at scale, and current email spam statistics make the reason clear: providers are tightening authentication rules because unauthenticated mail creates risk for both senders and recipients.
That is why it is important to learn how to set up DMARC in Office 365 correctly, from confirming the prerequisites and building your record to publishing it in DNS, choosing a safe starting policy, verifying that it works, and moving toward full enforcement without blocking legitimate mail.
Prerequisites Before Setting Up DMARC in Office 365
DMARC is not a standalone protocol. It’s a policy layer on top of SPF and DKIM that tells receiving mail servers what to do when those checks fail. If SPF or DKIM are misconfigured or not aligned, DMARC enforcement will start acting on that misalignment the moment you move past p=none.
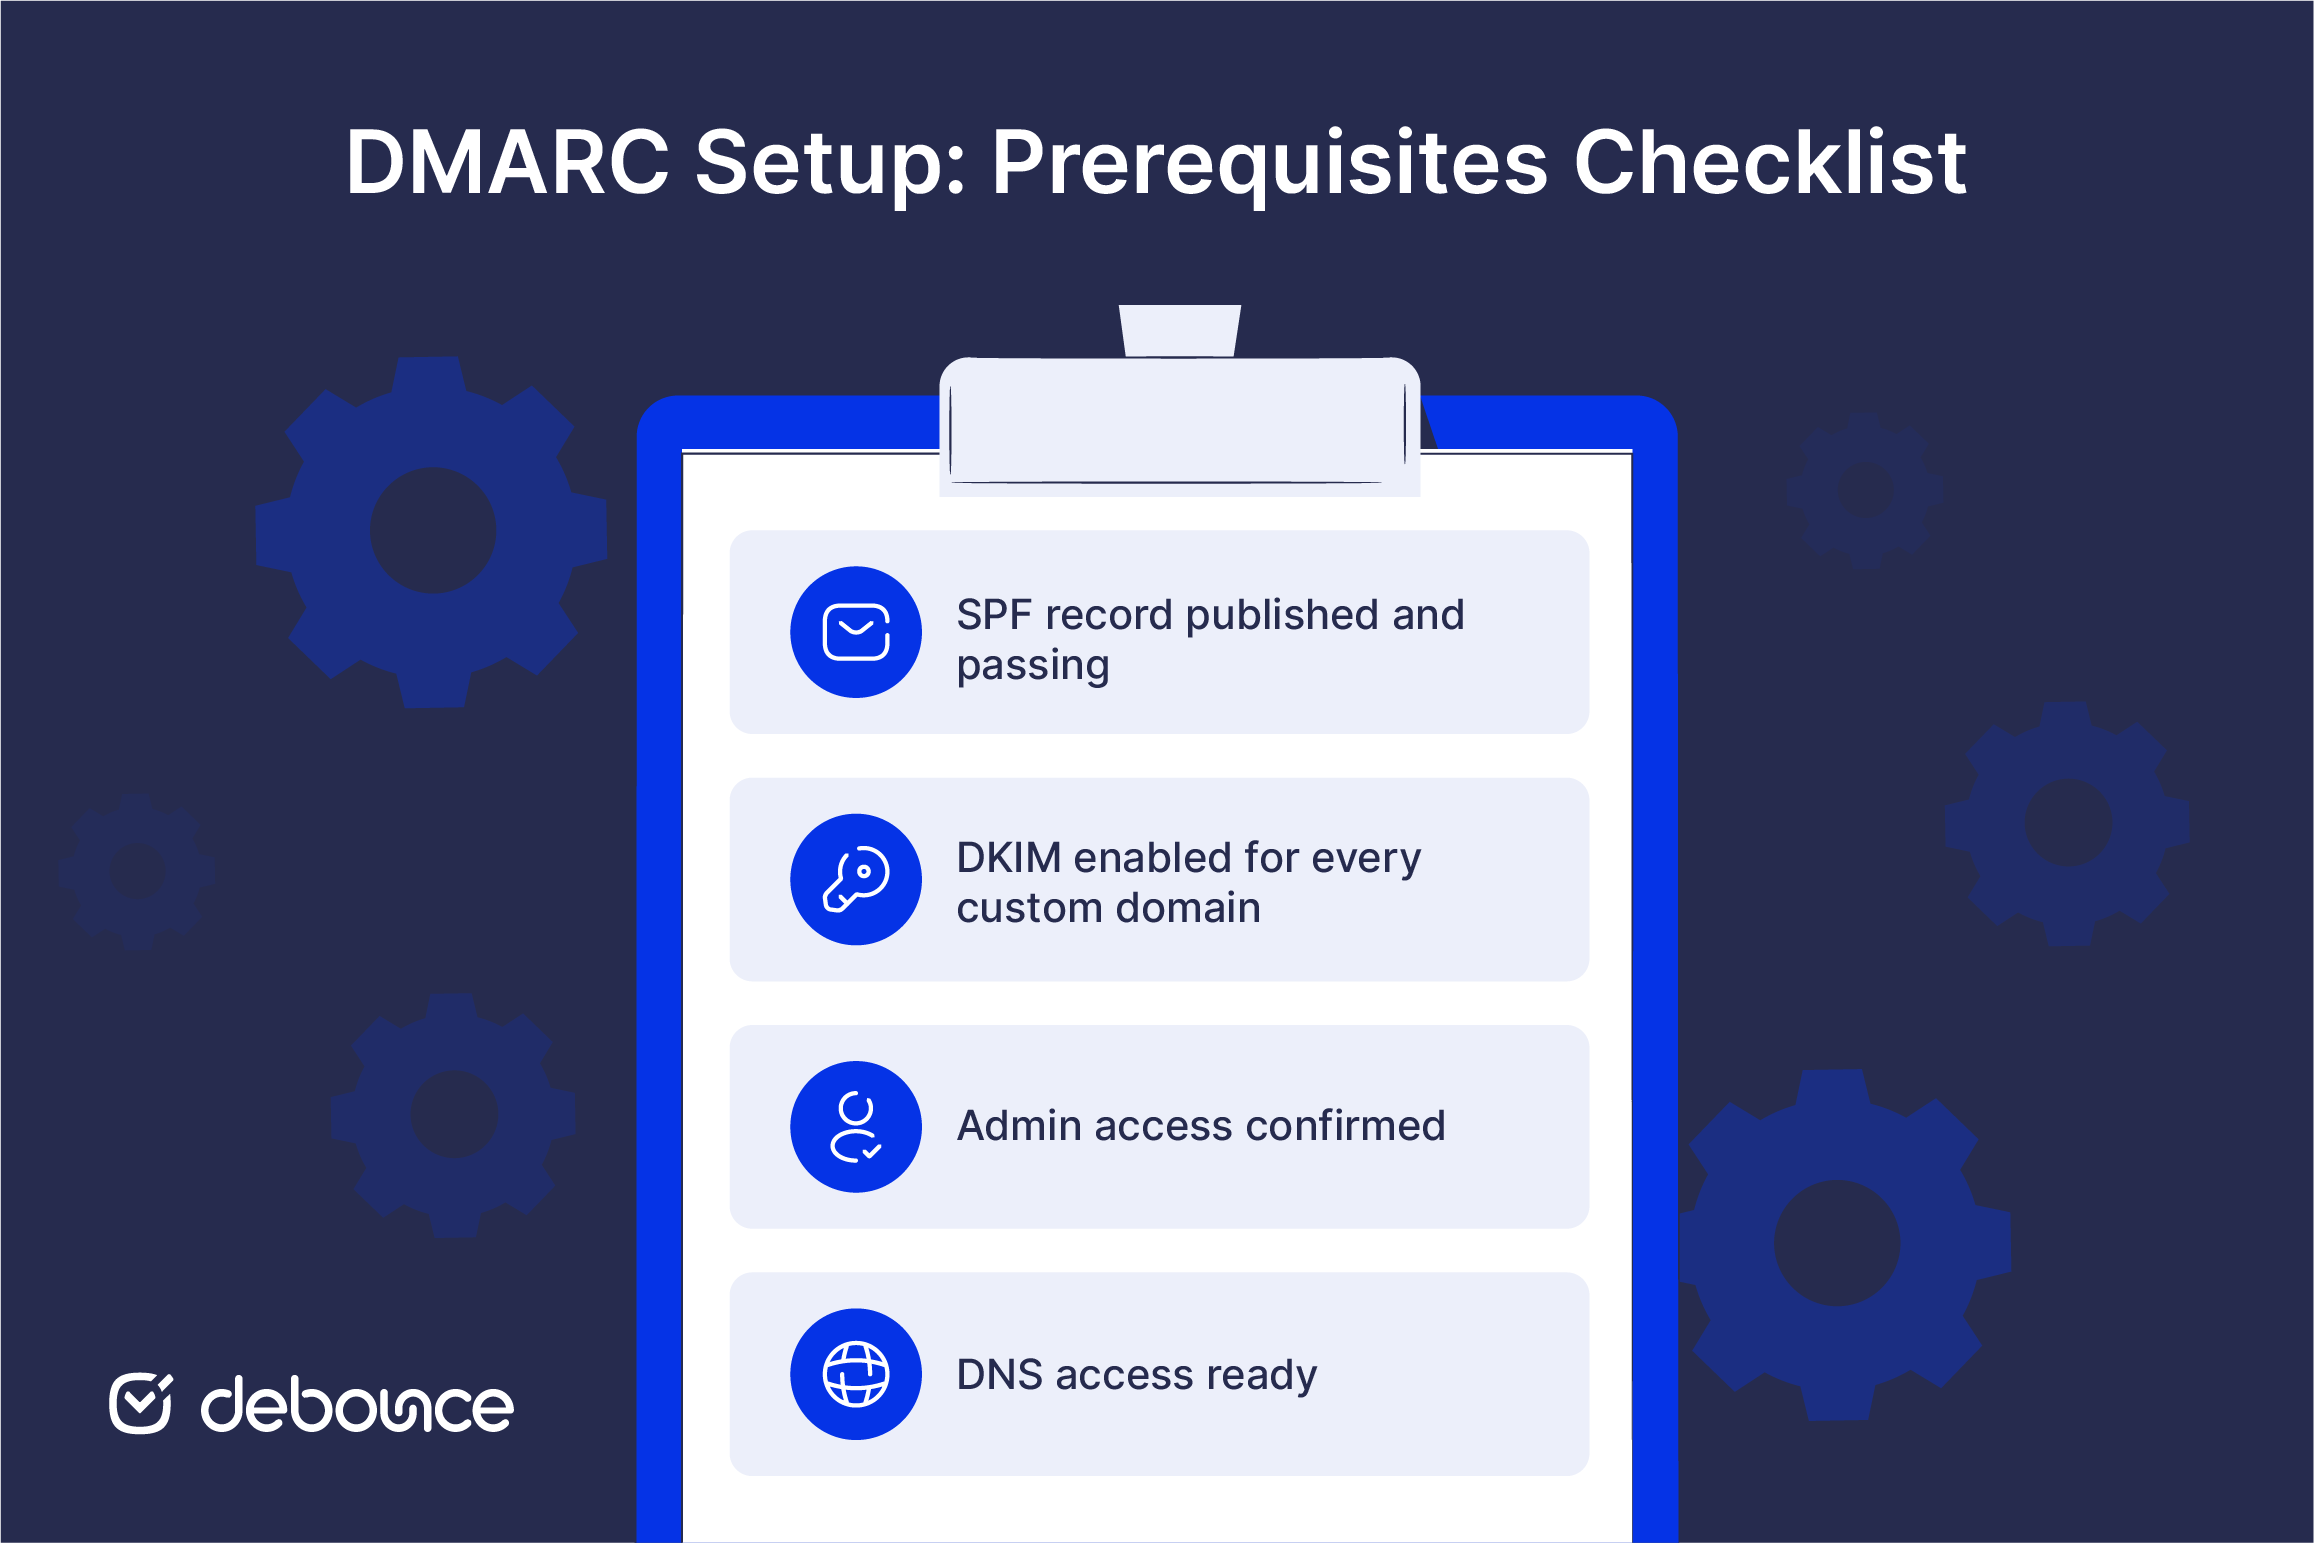 Confirm all four prerequisites below before publishing your DMARC record:
- SPF record published and passing: For Microsoft 365 tenants, the SPF record must include include:spf.protection.outlook.com plus any additional third-party senders (SendGrid, Mailchimp, HubSpot, etc.) that send on behalf of your domain.
- DKIM signing enabled for every custom domain: Microsoft 365 does not enable DKIM for custom domains automatically. Open the Microsoft Defender portal, go to the DKIM page under Email & Collaboration → Policies & Rules → Threat Policies, and confirm signing is toggled on for the custom domain.
- Global Administrator or Security Administrator access to the Microsoft 365 tenant for any verification steps inside the Defender portal.
- DNS access for the custom domain to publish the DMARC TXT record at _dmarc.yourdomain.com in your DNS host’s control panel.
How to Set Up DMARC in Office 365: Step by Step
The five steps below take 10–15 minutes of active work, plus DNS propagation time (anywhere from a few minutes to 48 hours, depending on your DNS provider and TTL settings).

DMARC setup happens entirely in DNS, not in the Microsoft Defender portal. Microsoft 365 handles inbound DMARC checks automatically through Exchange Online Protection, but there is no Defender portal setting to configure outbound DMARC on your custom domain. That record lives in your DNS zone.
Step 1: Confirm SPF and DKIM are working
Send a test email from your custom domain to an external Gmail or Yahoo address. Open the email and view the full message headers (in Gmail: three-dot menu → “Show original”).
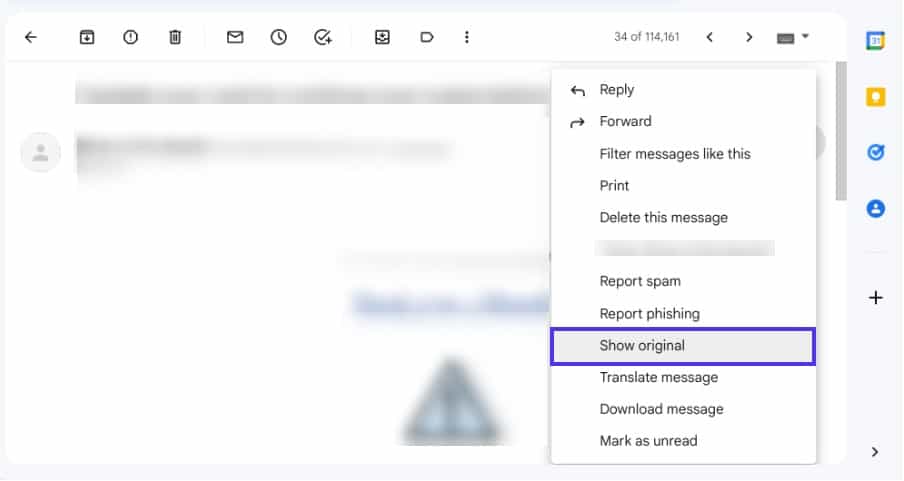
In the Authentication-Results header, confirm:
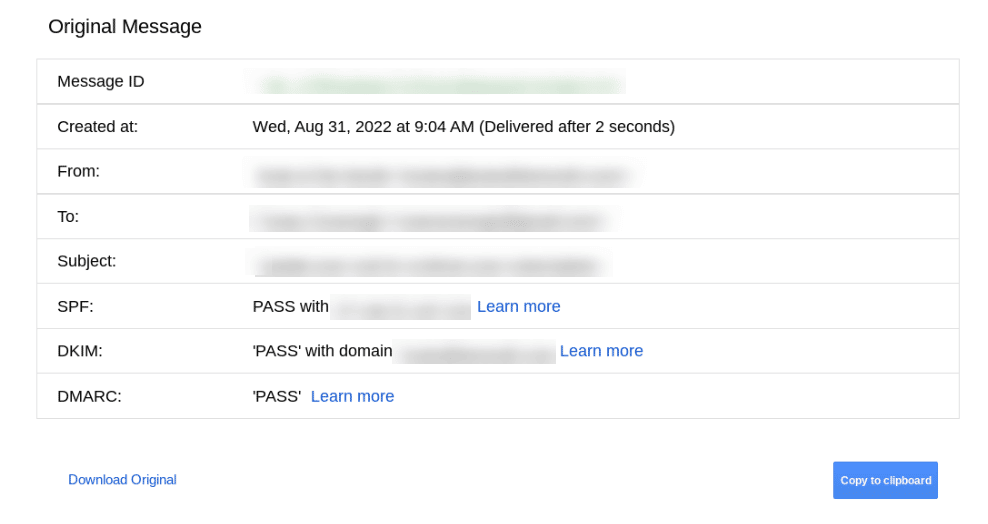
- spf=pass — SPF is authorized and passing
- dkim=pass — DKIM is signing correctly, and the signature is verified
If either shows fail or neutral, stop here and fix the authentication issue first. Publishing a DMARC record over failing SPF or DKIM will cause legitimate emails to be quarantined or rejected as soon as you move the policy past p=none.
Step 2: Decide on the initial DMARC policy
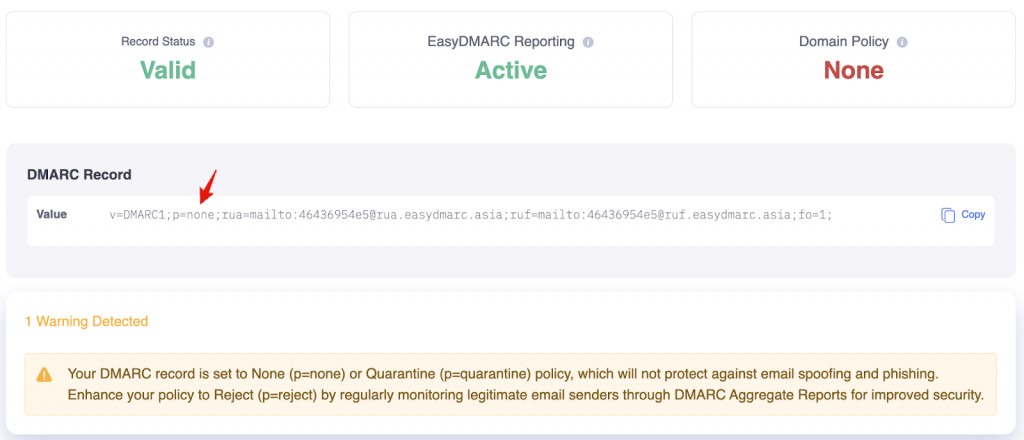
Start with p=none for every new DMARC deployment. This policy collects DMARC aggregate reports without affecting email delivery. Failing messages are still delivered, but receiving mail servers report the authentication results back to the address specified in your rua= tag. That data tells you which sending sources are aligned and which aren’t before enforcement begins.
Jumping directly to p=quarantine or p=reject is the single most common cause of lost legitimate email during DMARC rollouts. If a third-party sending platform isn’t aligned yet, a strict policy will quarantine or bounce real mail from that source immediately. The p=none stage exists specifically to prevent that.
Step 3: Build the DMARC Record
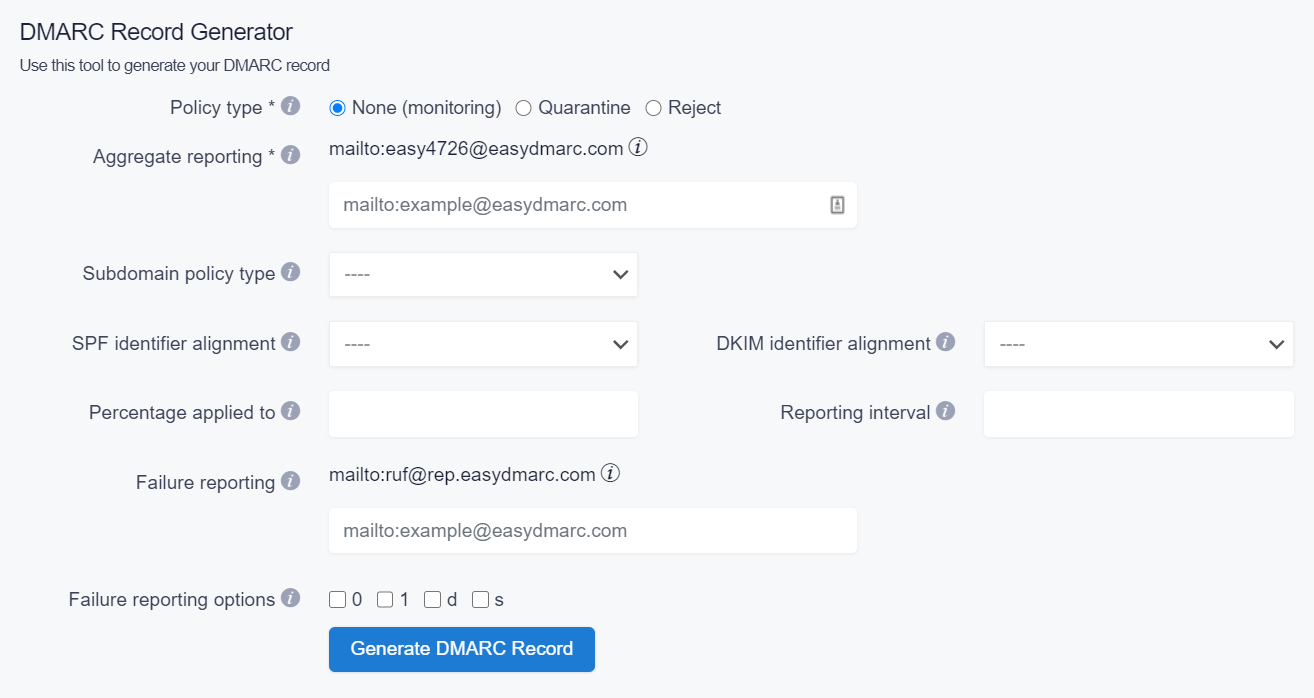
The basic DMARC record for a new deployment looks like this:
v=DMARC1; p=none; rua=mailto:[email protected]; pct=100;
Here’s what each tag means:
- v=DMARC1 — the protocol version. Required as the first tag in every DMARC record.
- p=none — the policy applied to messages that fail DMARC alignment. Start with none, then progress to quarantine and reject as alignment stabilizes.
- rua=mailto:address — the mailbox where aggregate reports are sent. Use a dedicated mailbox such as [email protected], or route reports to a third-party DMARC analyzer if you’d prefer a dashboard view.
- pct=100 — the percentage of failing messages the policy applies to. Set this to 100 from the start. Gradual percentage rollouts are rarely necessary in modern DMARC deployments and add unnecessary complexity.
For the complete tag reference, including optional tags like ruf (forensic reports), sp (subdomain policy), adkim, and aspf, see DMARC.org‘s official protocol documentation.
Step 4: Publish the DMARC record in DNS
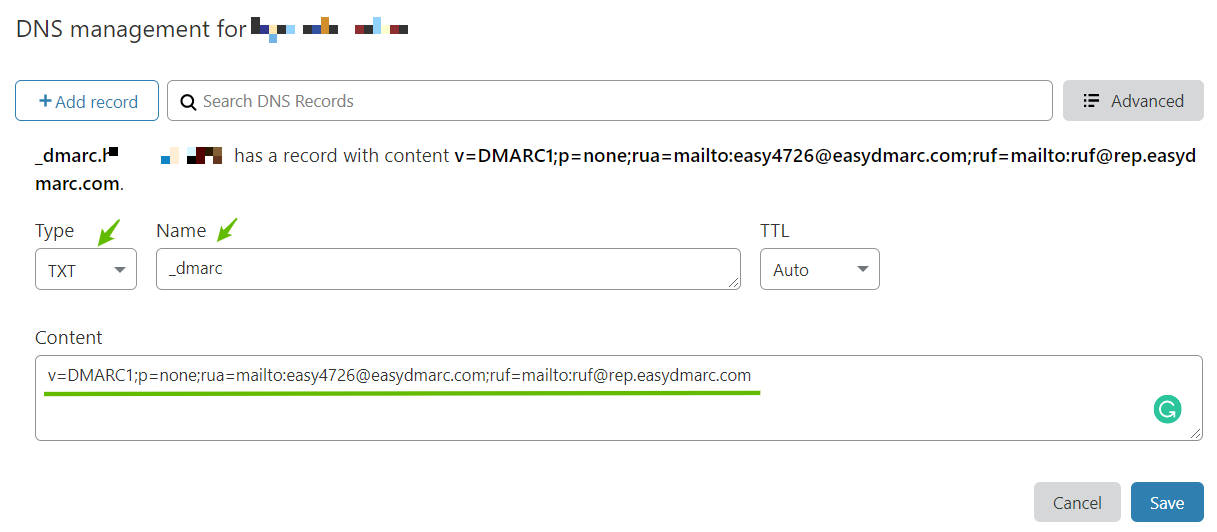
Log in to your domain’s DNS provider. Create a new TXT record with the following values:
- Host / Name: _dmarc (some providers ask for _dmarc.yourdomain.com; enter exactly what the DNS UI requires)
- Value / Content: the complete DMARC record built in Step 3, exactly as written
- TTL: 3600 (one hour) is standard; lower values propagate faster during testing
Save the record. DNS propagation typically completes within a few hours but can take up to 48 hours. During that window, the record may not be consistently visible from all resolvers.
Step 5: Verify the DMARC record is active
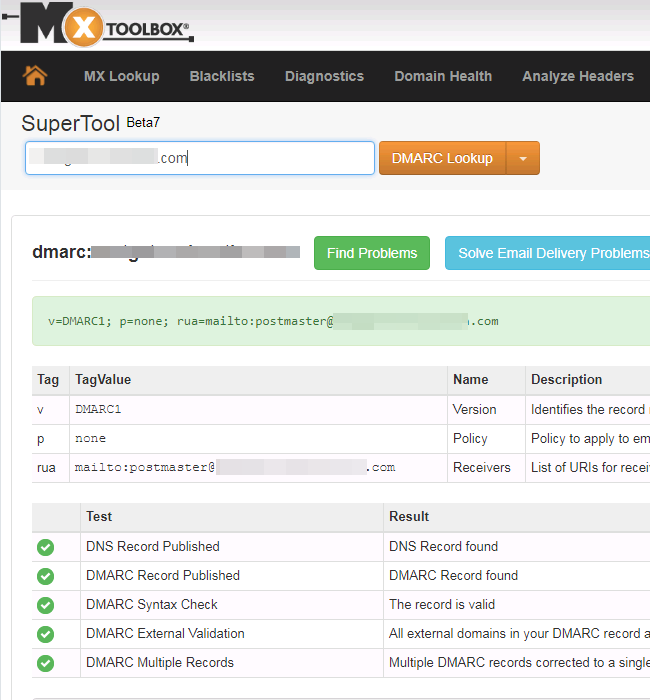
Once the record has propagated, verify it in two ways:
- DNS lookup: Go to MXToolbox’s DMARC lookup tool, enter your domain, and confirm the record returns correctly parsed and valid. If the lookup fails or returns an error, check your DNS record formatting, as a missing semicolon or an incorrect host name is usually the cause.
- Authentication header check: Send another test email from your custom domain to Gmail, Yahoo, or an external Outlook address. Open the full headers and confirm the Authentication-Results section now shows dmarc=pass for the sending domain.
DMARC aggregate reports start arriving in the rua= mailbox within 24–72 hours of the record going live. Review the first batch carefully before considering any move to a stricter policy.
Understanding DMARC Policy Options: None, Quarantine, and Reject
Every successful DMARC deployment moves through all three policy stages over weeks or months. Skipping stages risks rejecting legitimate mail before all sending sources are properly aligned. The staged approach is how you protect mail flow while building toward full enforcement.
Monitoring mode: p=none
v=DMARC1; p=none; rua=mailto:[email protected]; pct=100;
With p=none, receiving mail servers collect DMARC results and send them back to your rua= address, but failing messages are still delivered normally. Nothing is quarantined or rejected.
Stay in p=none for a minimum of 2–4 weeks. Use that time to read the aggregate reports and confirm that every legitimate sending source, such as Microsoft 365, marketing platforms, transactional senders, and CRMs, is passing DMARC alignment. Any source showing failures needs to be fixed before the policy tightens.
Move to p=quarantine only when reports consistently show passing rates above 95% for all legitimate senders over multiple reporting cycles.
Soft enforcement: p=quarantine
v=DMARC1; p=quarantine; rua=mailto:[email protected]; pct=100;
With p=quarantine, receiving mail servers route failing messages to the spam or junk folder rather than the inbox. Legitimate but unaligned mail still arrives, just in a degraded location where recipients are less likely to see it.
This policy stage is a useful intermediate checkpoint. It imposes consequences for misaligned mail without the hard bounces that p=reject creates. Stay here for another 2–4 weeks and monitor reports closely for any legitimate mail being misrouted.
Move to p=reject only when DMARC reports confirm consistent alignment across all sources and zero legitimate mail is being quarantined.
Full enforcement: p=reject
v=DMARC1; p=reject; rua=mailto:[email protected]; pct=100;
With p=reject, receiving mail servers refuse messages that fail DMARC alignment outright. Failing messages bounce back to the sender; they don’t reach the recipient at all.
This is the goal of every DMARC implementation. Full p=reject enforcement provides complete protection against domain spoofing and satisfies the requirements of Gmail, Yahoo, and Microsoft for high-volume senders. It also protects your domain and IP reputation by preventing unauthorized senders from using your domain name to deliver mail.
Continue monitoring DMARC reports at p=reject. New sending sources, including new vendors, marketing tools, and integrations, can still cause alignment failures and must be onboarded with authentication in place before going live.
Common DMARC Setup Errors in Office 365 and How to Fix Them
Most DMARC failures in Microsoft 365 environments are alignment problems, not protocol errors. This means the record is technically valid, but the email being sent doesn’t align with the DKIM signing domain or the SPF-authorized IPs.
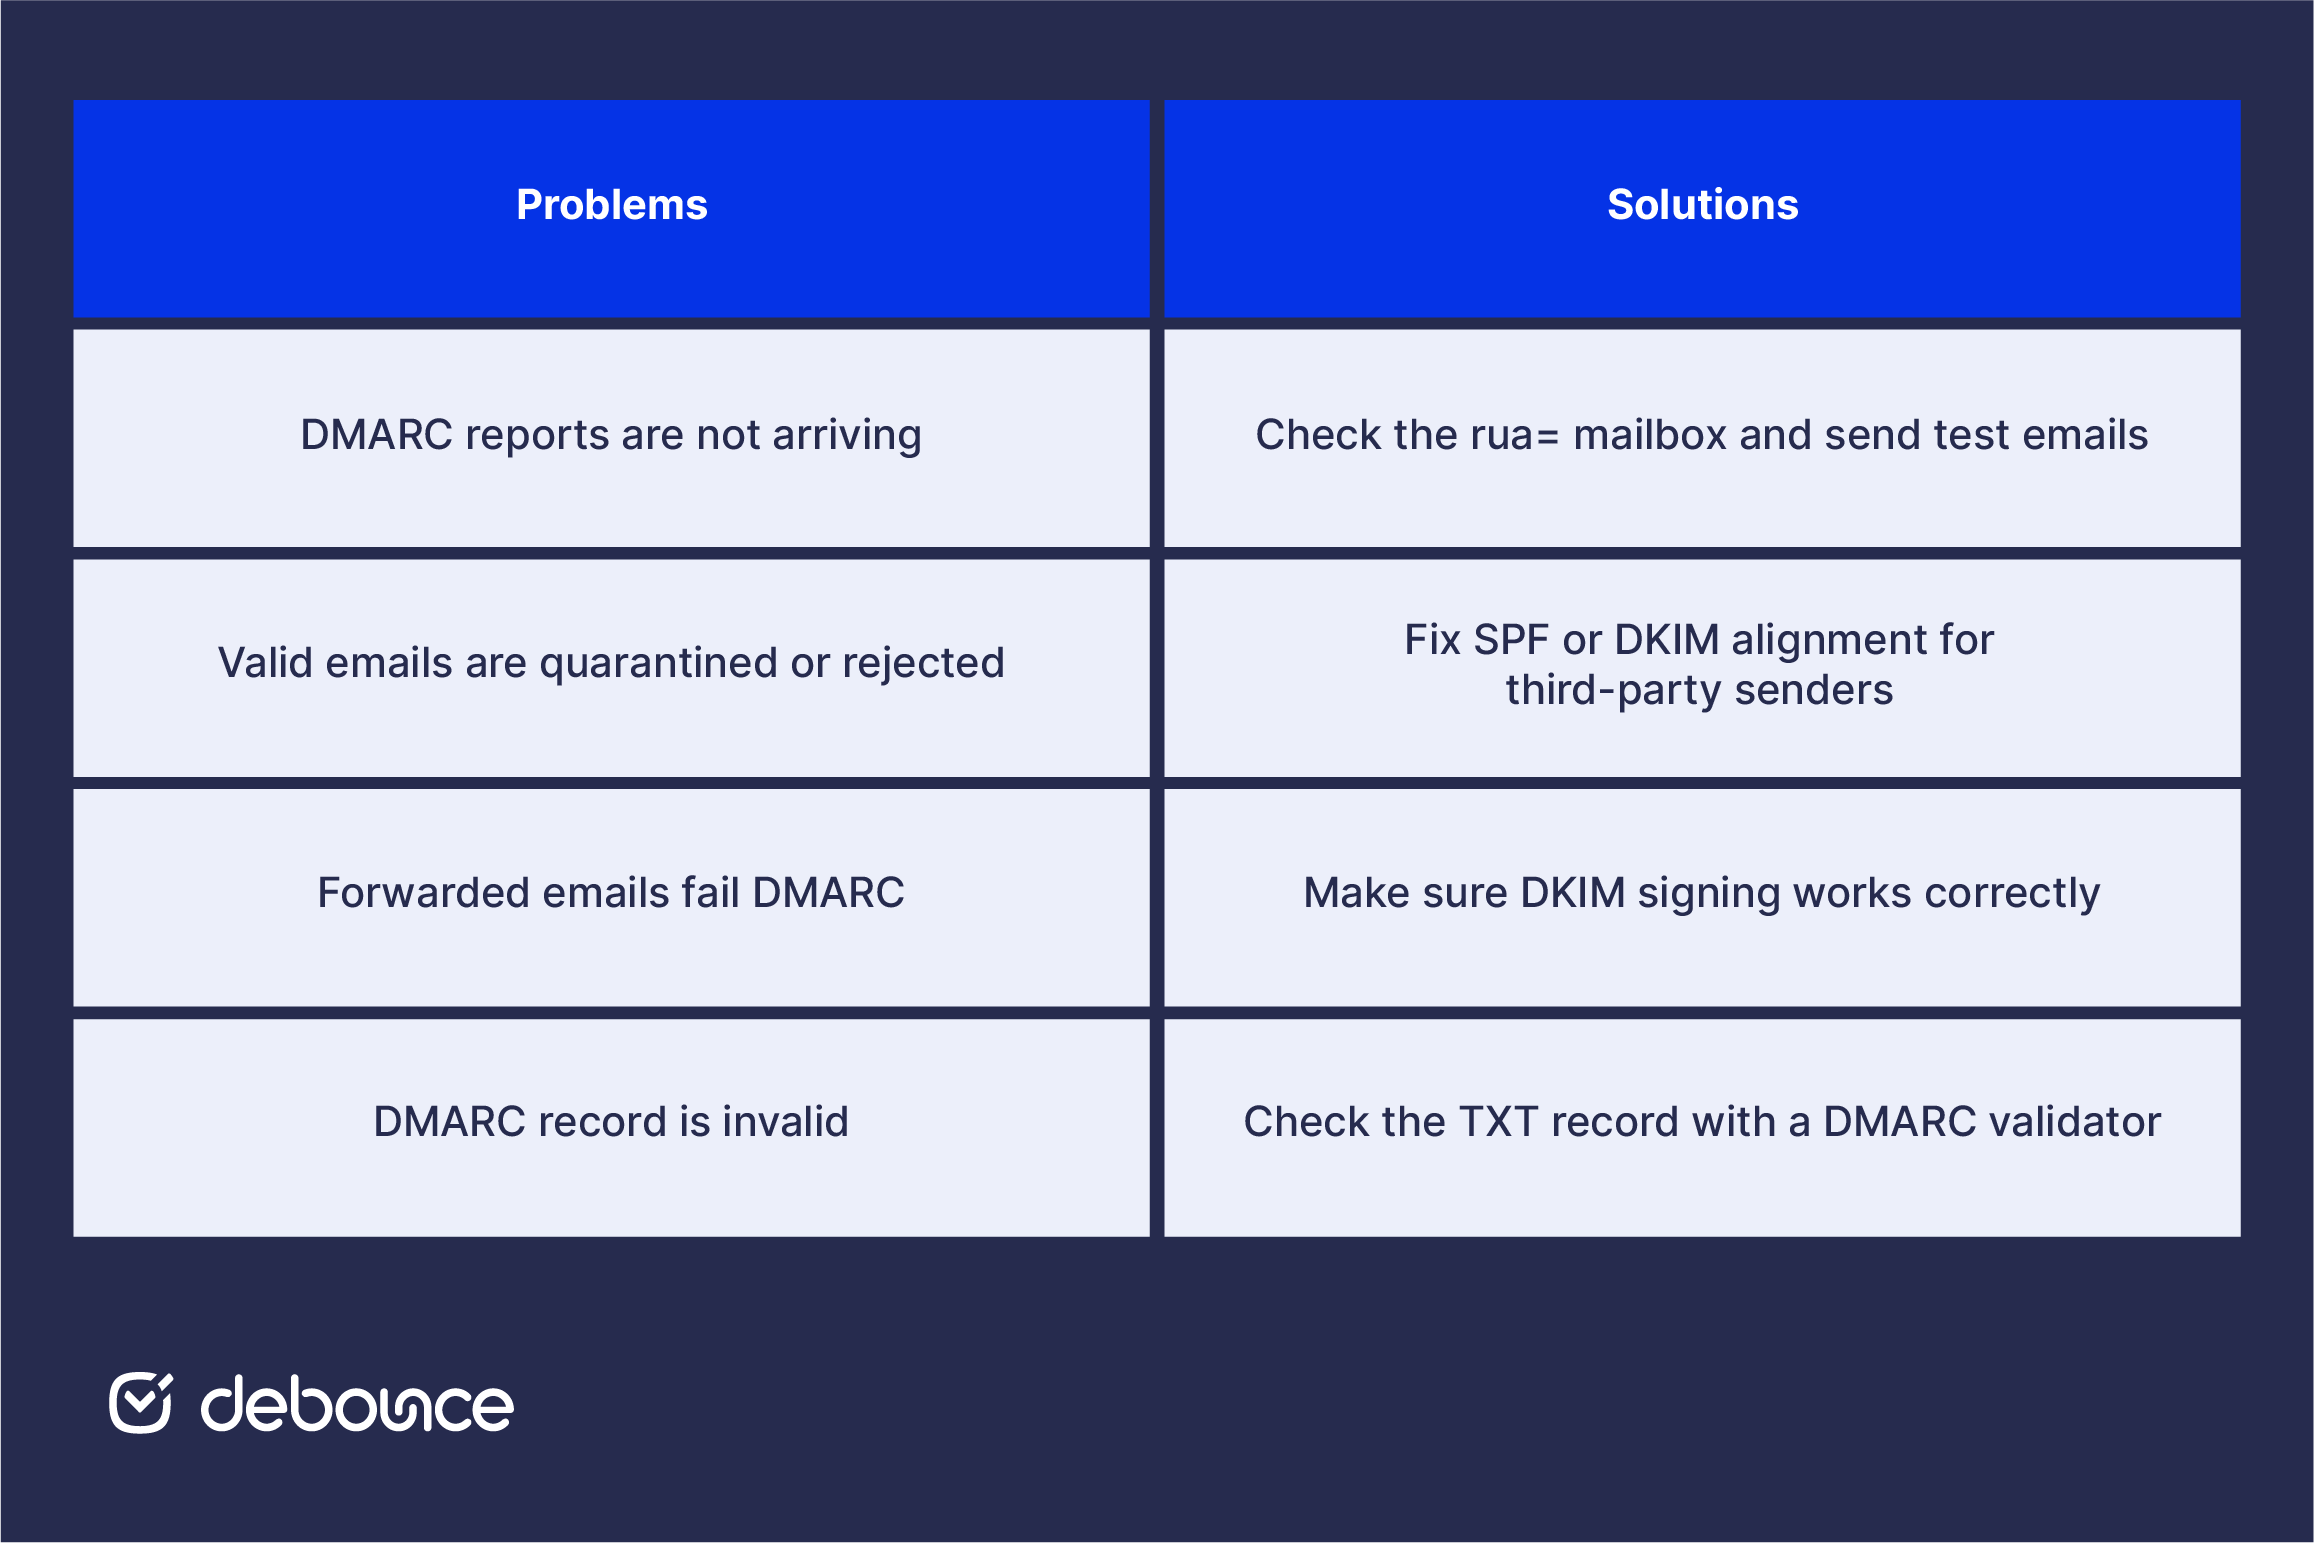
DMARC reports are empty
Diagnose: The rua= mailbox address is wrong, the mailbox is blocking incoming reports, or the domain isn’t sending enough volume for major providers to have generated reports yet.
Fix: Confirm the rua= mailbox exists, accepts external mail, and isn’t being filtered by an aggressive spam rule. Send a few test emails from the domain to Gmail and Yahoo addresses; those providers typically generate reports within 24–48 hours if DMARC is configured correctly.
Legitimate email is being quarantined or rejected
Diagnose: A third-party sending platform isn’t aligned. The most common cause is a marketing tool, CRM, or transactional email provider that hasn’t been added to SPF or configured to sign with DKIM for the custom domain.
Fix: Review the DMARC aggregate reports to identify which source is failing. Either add the source to your SPF record (include:thirdparty.com), configure DKIM signing for that source through its platform settings, or temporarily move back to p=none until alignment is corrected. Never leave the policy at p=reject while known sources are failing.
DMARC alignment failures after forwarding
Diagnose: Forwarded emails often break SPF alignment because the forwarding server’s IP isn’t in the original sender’s SPF record. DKIM typically survives forwarding intact, so this scenario often becomes a DKIM-only alignment case.
Fix: Ensure DKIM is signing correctly for the original sender. DKIM-aligned mail passes DMARC even when SPF fails due to forwarding. If DKIM is also failing after forwarding, the forwarding system is modifying the message content and breaking the DKIM signature. This situation generally requires ARC (Authenticated Received Chain) support from the forwarding server to resolve.
DMARC record format errors
Diagnose: Typos in the DMARC TXT record can invalidate the entire policy. Common issues include a missing v=DMARC1 prefix, semicolons missing between tags, or the record split incorrectly across multiple DNS entries.
Fix: Run the published record through MXToolbox’s DMARC validator and confirm it returns parsed and valid. Check that the record exists as a single TXT entry under _dmarc.yourdomain.com, not split across two records, and that each tag is separated by a semicolon.
DMARC Done Right Protects Your Domain
Setting up DMARC is easier when you follow the steps in order. Verify SPF and DKIM, build the record, publish it in DNS, move slowly through each policy stage, with enough time to read the reports and fix alignment issues before tightening enforcement.
Since DMARC is the final layer of email authentication, it depends on SPF and DKIM working correctly first. If those records are misconfigured or not aligned, DMARC enforcement may block legitimate mail instead of protecting the domain from spoofing.
Authentication, however, does not solve every deliverability problem. A properly authenticated domain sending to a list full of invalid, disposable, or inactive addresses will still generate hard bounces, and those bounces affect your email sender reputation regardless of how clean your DMARC record is.
Before your next campaign, upload your list to DeBounce and run a full validation pass through Email List Validation. Authentication confirms the email came from you, while list hygiene confirms it’s going somewhere real. Both are necessary to give each campaign a stronger chance of reaching the inbox.