
Email marketing can be a blessing and a curse - especially when not done correctly. The days of email blasts are gone but not forgotten....

Key Takeaways
Within 24–72 hours of publishing a DMARC record, the first aggregate report arrives, and it immediately reveals every legitimate and unauthorized server that sent email as your domain during that period. The catch, as documented in DMARC.org‘s protocol specification, is that these reports are machine-formatted XML files designed for automated parsers, not human readers.
Knowing how to read DMARC reports turns that raw data into operational intelligence. The visibility is genuinely valuable, but only after the XML is decoded into something you can act on. Current email spam statistics show why that visibility matters: spoofing and impersonation are common, so you need DMARC reports to identify which sources are sending email as your domain.
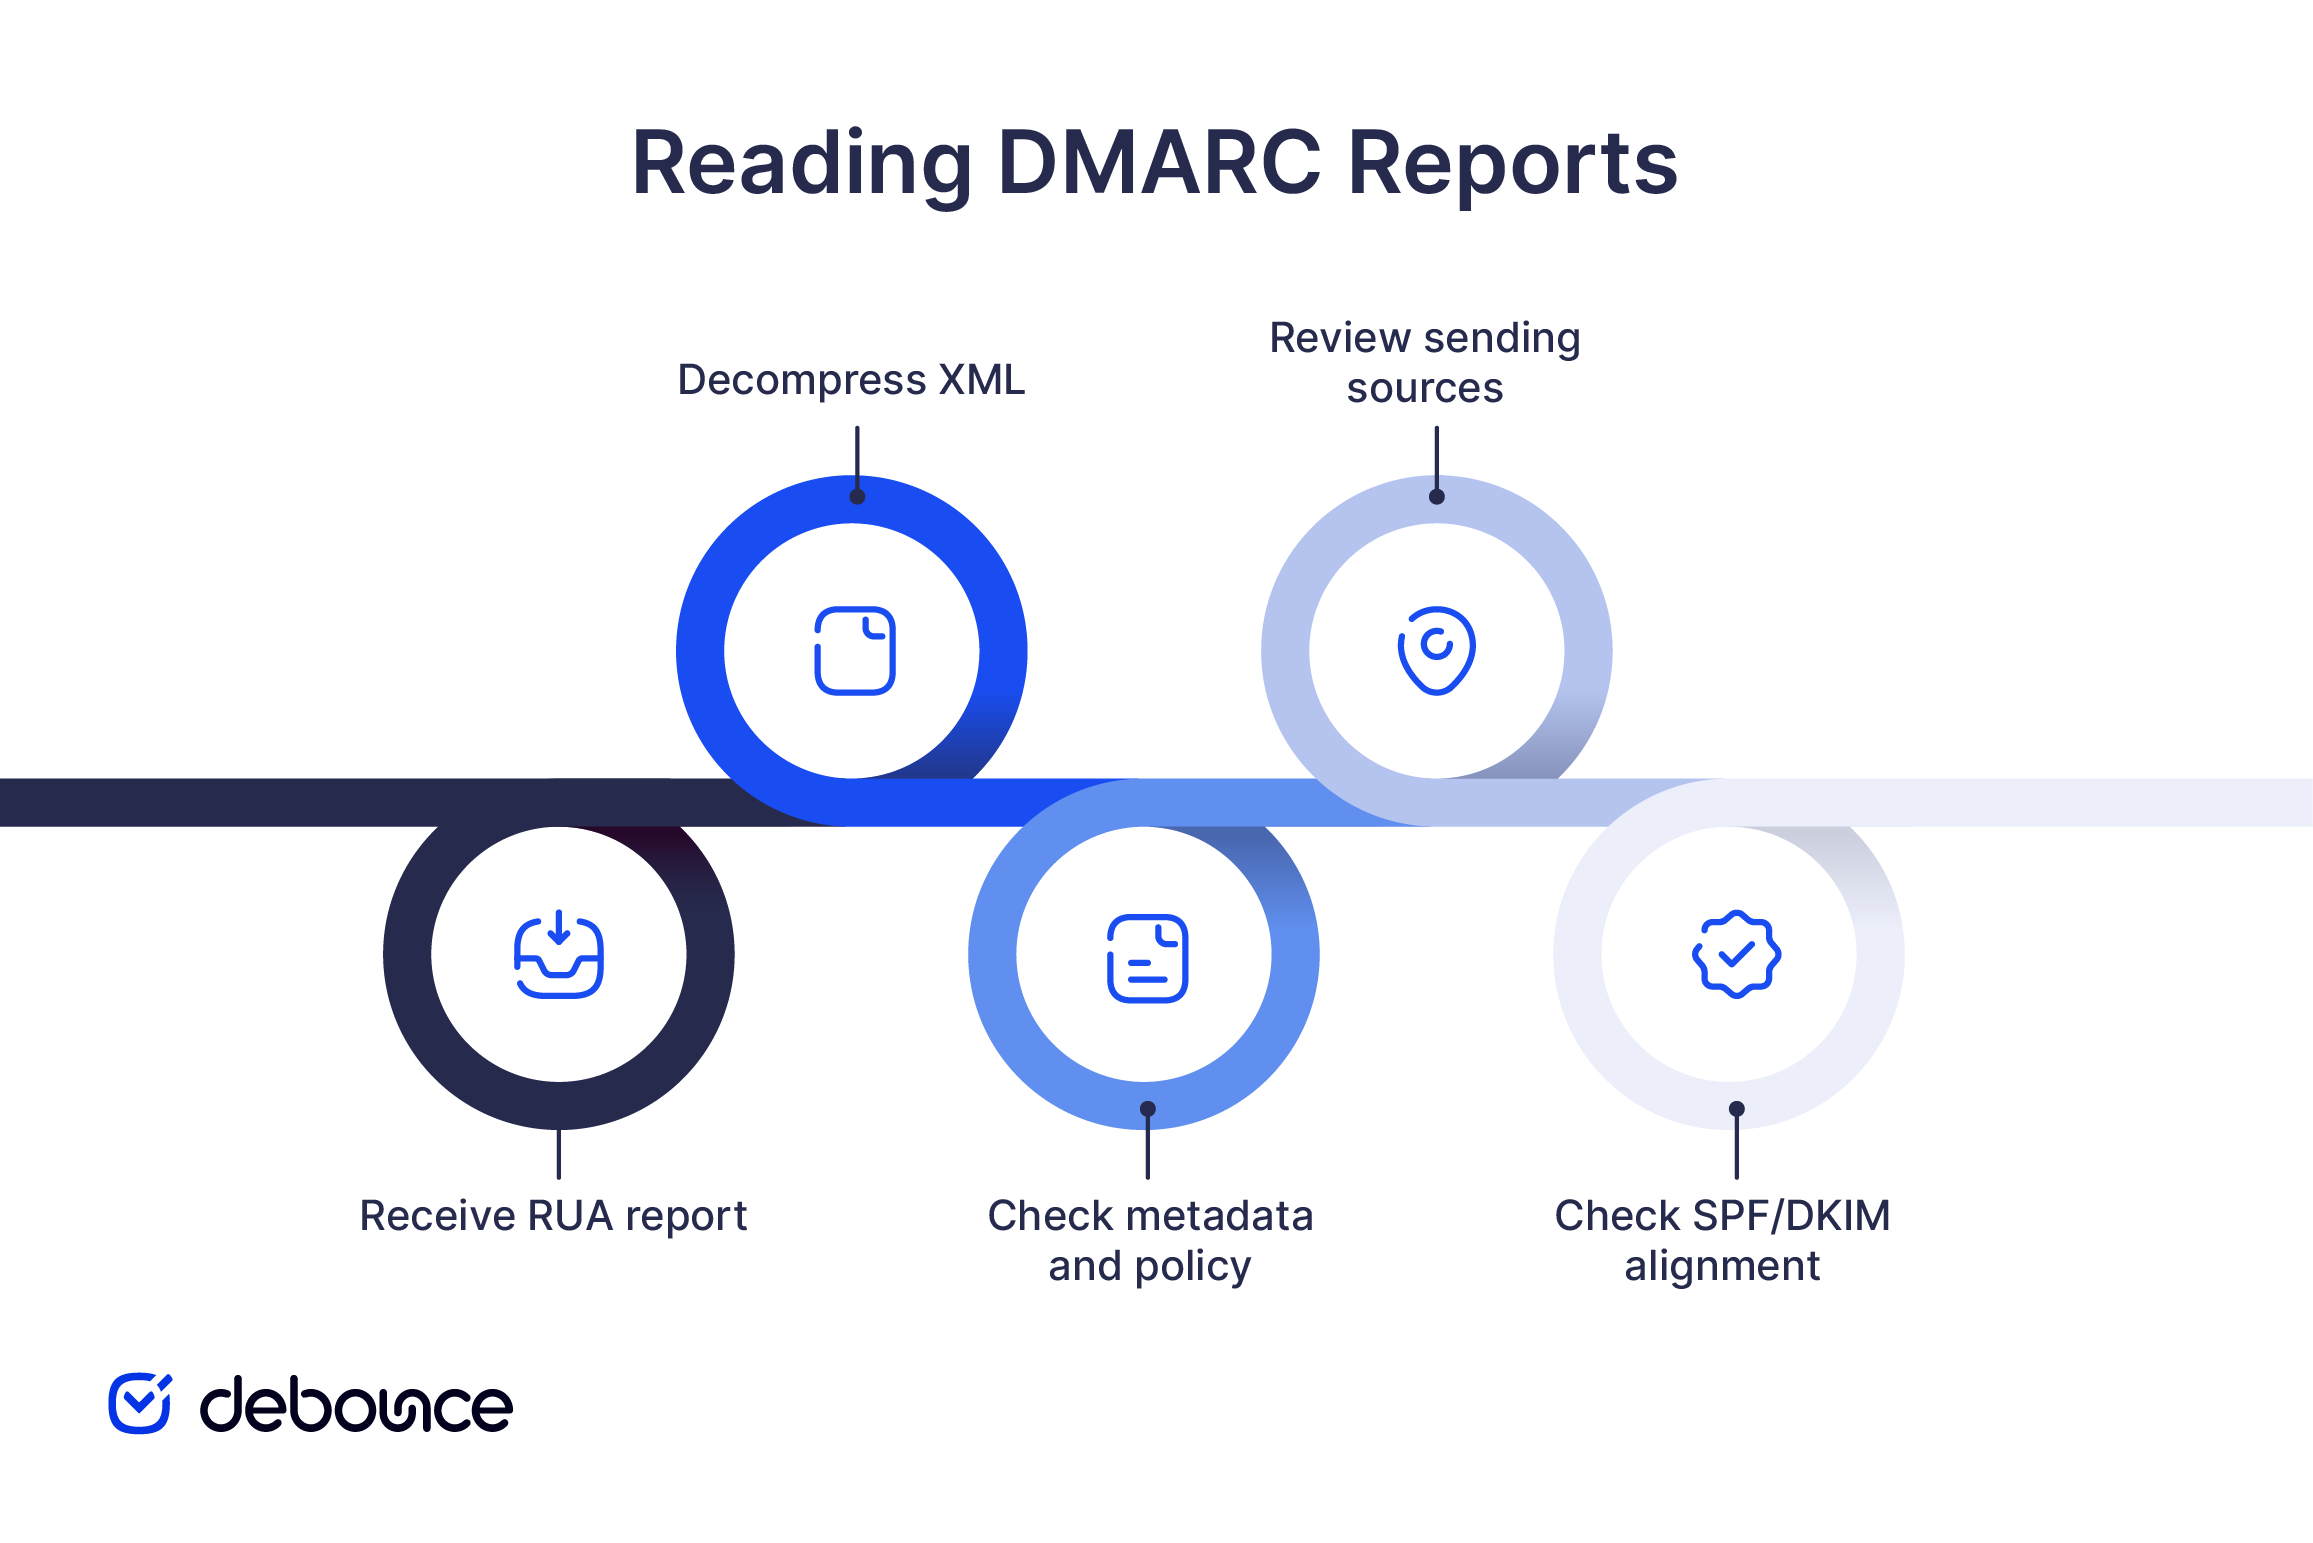
The first read takes 15–30 minutes. Subsequent reads from the same senders take 2–3 minutes once the pattern is familiar. The steps below walk through a complete DMARC aggregate report from start to finish.
Here’s an anonymized XML snippet that illustrates the report structure used in the review steps below:
<?xml version="1.0" encoding="UTF-8" ?>
<feedback>
  <report_metadata>
    <org_name>google.com</org_name>
    <email>[email protected]</email>
    <report_id>10296513920663916120</report_id>
    <date_range>
      <begin>1716768000</begin>
      <end>1716854400</end>
    </date_range>
  </report_metadata>
  <policy_published>
    <domain>yourdomain.com</domain>
    <adkim>r</adkim>
    <aspf>r</aspf>
    <p>none</p>
    <pct>100</pct>
  </policy_published>
  <record>
    <row>
      <source_ip>209.85.220.41</source_ip>
      <count>847</count>
      <policy_evaluated>
        <disposition>none</disposition>
        <dkim>pass</dkim>
        <spf>pass</spf>
      </policy_evaluated>
    </row>
    <auth_results>
      <dkim>
        <domain>yourdomain.com</domain>
        <result>pass</result>
      </dkim>
      <spf>
        <domain>yourdomain.com</domain>
        <result>pass</result>
      </spf>
    </auth_results>
  </record>
  <record>
    <row>
      <source_ip>198.51.100.23</source_ip>
      <count>312</count>
      <policy_evaluated>
        <disposition>none</disposition>
        <dkim>fail</dkim>
        <spf>fail</spf>
      </policy_evaluated>
    </row>
    <auth_results>
      <dkim>
        <domain>unknownsender.net</domain>
        <result>fail</result>
      </dkim>
      <spf>
        <domain>unknownsender.net</domain>
        <result>fail</result>
      </spf>
    </auth_results>
  </record>
</feedback>Confirm a dedicated inbox is collecting reports at the address specified in your DMARC record’s rua= tag (for example, [email protected]). Mailbox providers send aggregate reports daily, so even a low-traffic domain accumulates dozens of XML files per month; thus, a general shared inbox quickly becomes unmanageable.
For small domains with occasional review needs, a dedicated mailbox works fine. For anything beyond a few reports per week, or for organizations managing multiple domains, point the rua= tag to a DMARC analyzer’s ingest address for automated parsing.
Download the attached file from the report email. Most reports arrive as .xml.gz or .zip archives that need decompression first (on macOS and Linux, double-click or use gunzip; on Windows, right-click and extract).
Open the resulting .xml file in any text editor, such as VS Code, Sublime Text, or Notepad++. You can also open it in a browser, which often makes XML easier to scan because the sections appear as collapsible nodes instead of one long block of text.
For checking one report now and then, opening the XML file manually is fine. If you receive more than a few reports per week, use an automated parser instead. DMARC reports follow a consistent structure, so tools can turn the XML into tables and summaries much faster.
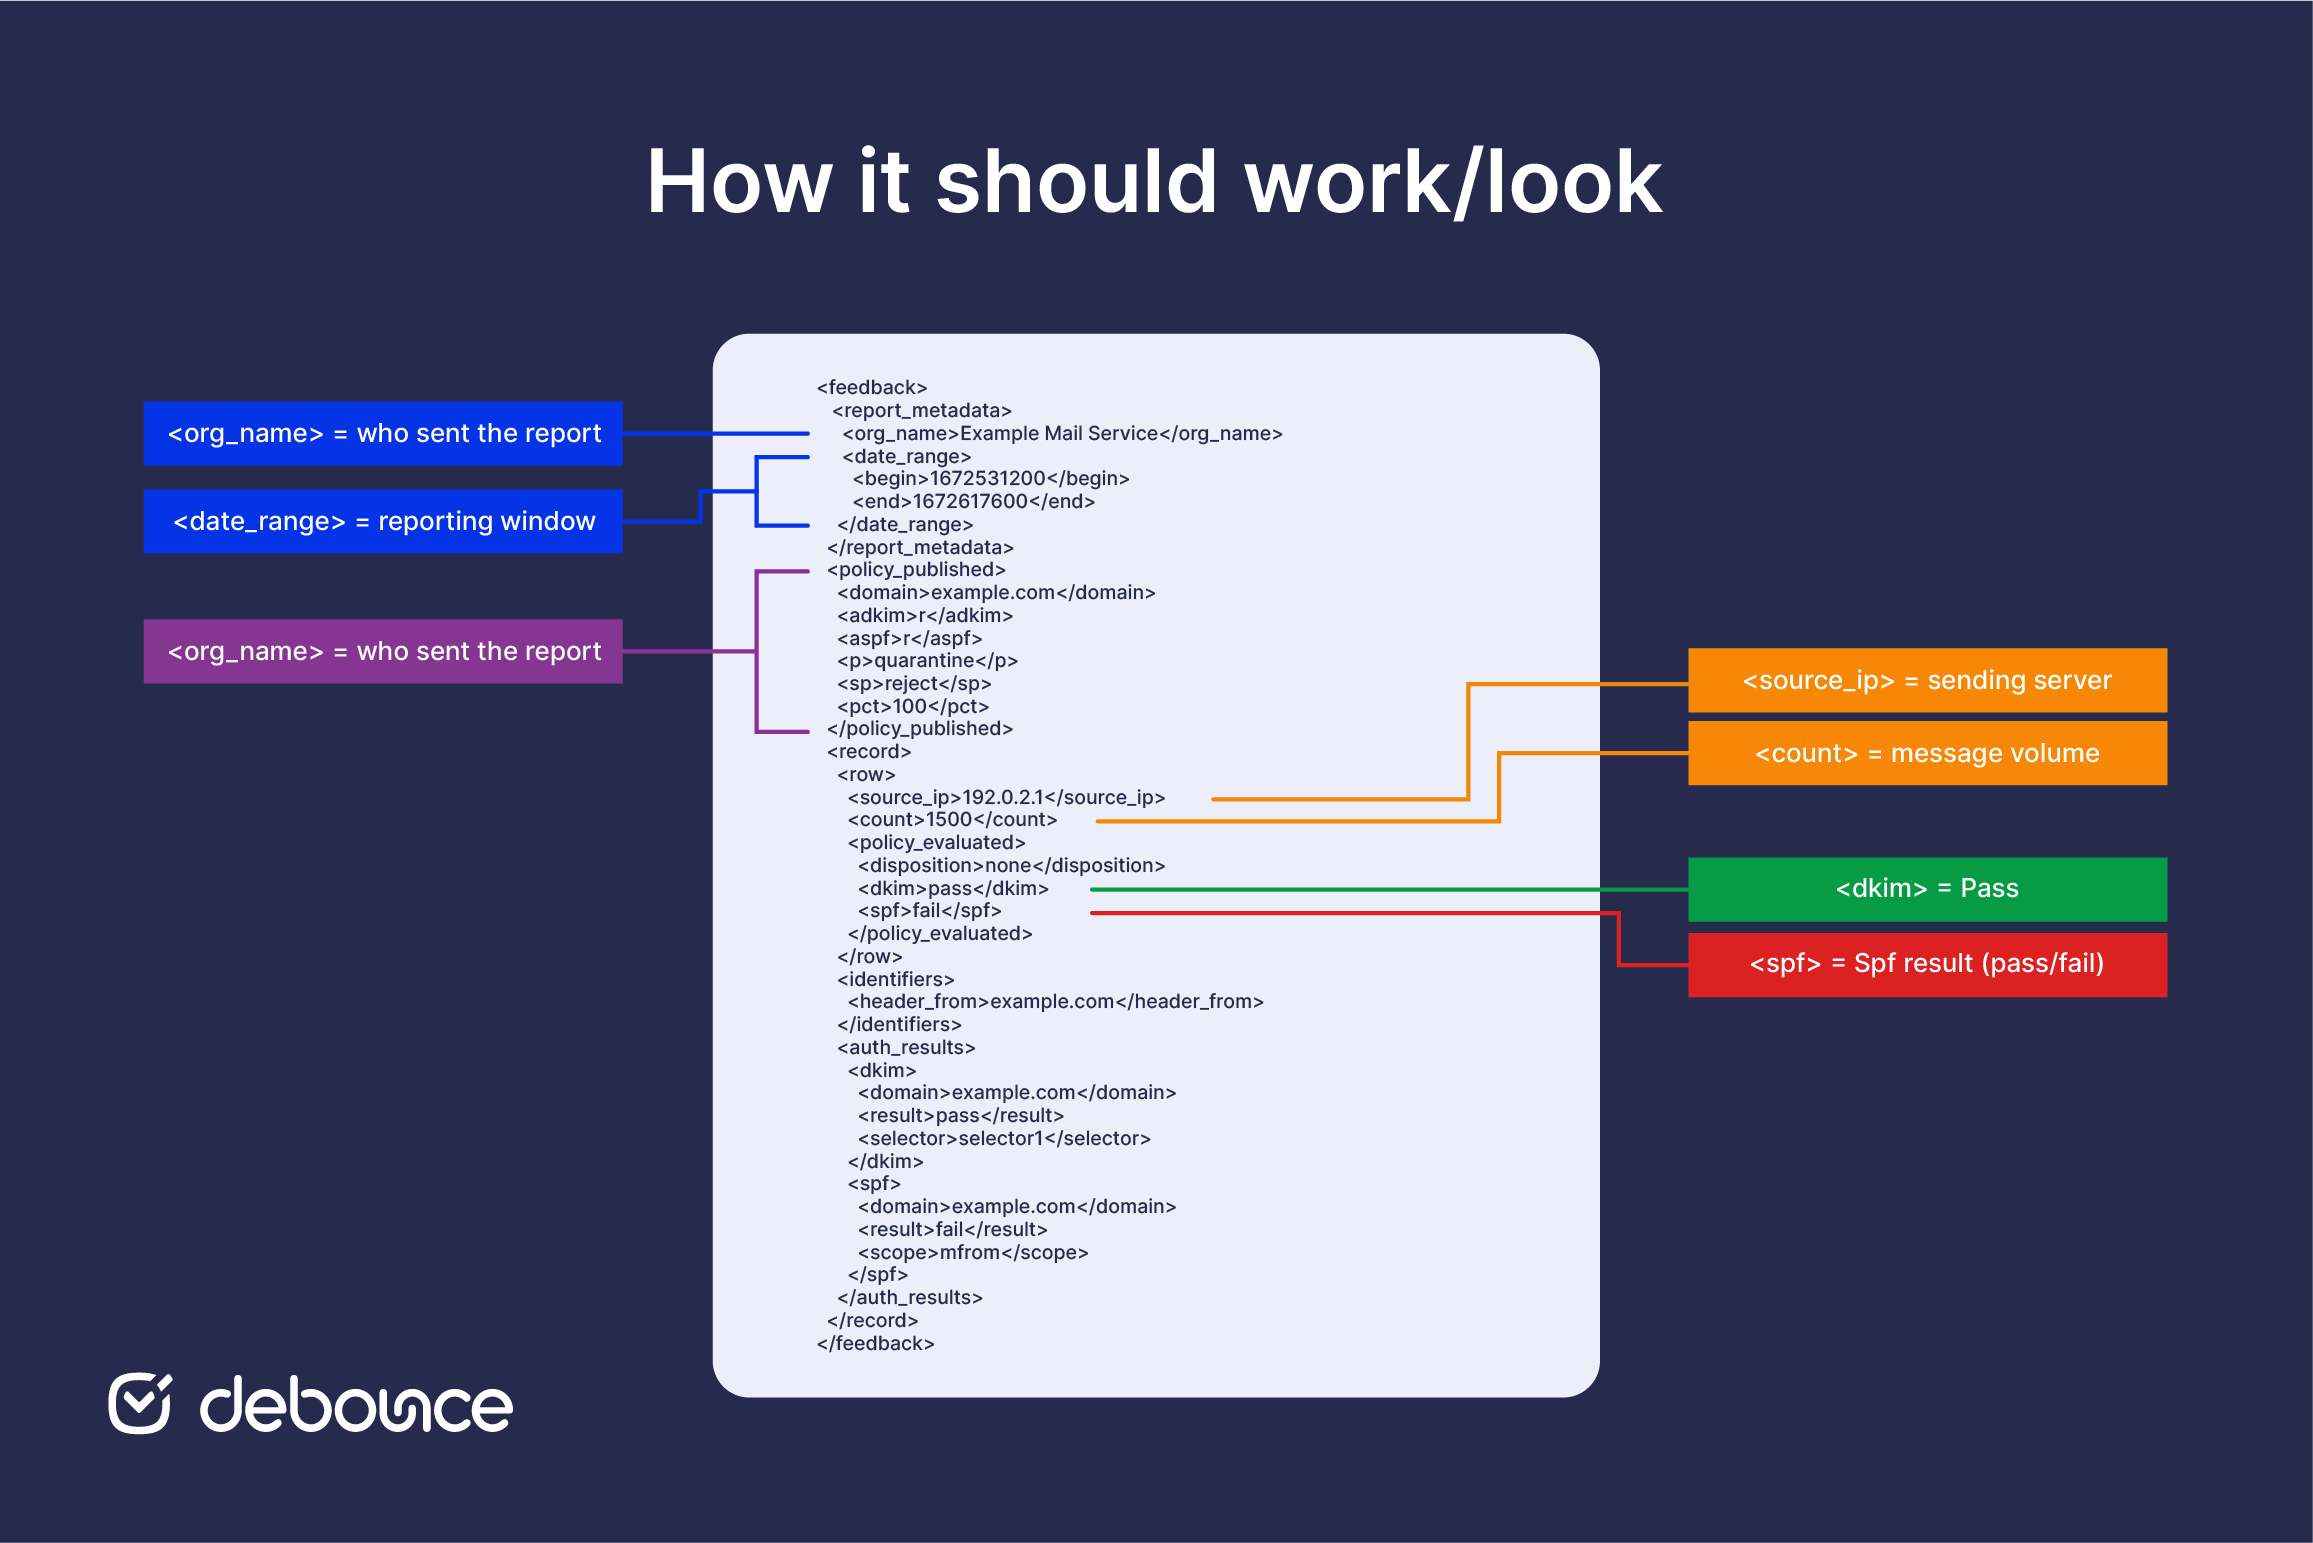
Locate the <report_metadata> block at the top of the file. It identifies the reporting organization (Google, Microsoft, Yahoo, Mail.ru, or others) and the Unix timestamps for the start and end of the report window. Converting those timestamps to readable dates confirms which 24-hour period the report covers.
Locate the <policy_published> block immediately after. It shows the DMARC policy that was active during the report window (p=none, p=quarantine, or p=reject) and the alignment modes for both SPF (aspf) and DKIM (adkim). The value r means relaxed alignment; s means strict.
Confirm the policy shown in the report matches what your DNS record currently shows. A mismatch means the report covers a period before a recent policy change propagated, which is expected and not a problem, just context for interpreting the results.
Scroll to the <record> blocks. Each record represents one sending IP and its results, grouped by message count. In the snippet above, 209.85.220.41 sent 847 messages and passed DMARC; 198.51.100.23 sent 312 messages and failed both SPF and DKIM.
For each record, capture the <source_ip> and <count>. The IP identifies which server claimed to send as your domain, while the count shows how many messages came from that server during the report window.
Run a reverse DNS lookup on each unfamiliar source IP. Legitimate senders resolve to recognizable hostnames (mail-sor-f41.google.com for Gmail, sendgrid.net for SendGrid, and amazonses.com for AWS SES). Unrecognized IPs warrant investigation before assuming they’re legitimate.
Inside each record, find the <auth_results> block. It contains the SPF result and the DKIM result for that source IP, along with the domain each authentication method evaluated.
DMARC requires only one of SPF or DKIM to pass in aligned mode for the overall message to pass DMARC. The <policy_evaluated><disposition> field shows the final verdict (none, quarantine, or reject) based on the policy active during the report window.
Flag any record where both SPF and DKIM show fail, and the source is supposed to be a legitimate sender. That’s a misconfigured sender that needs to be fixed before policy can safely tighten. A record showing spf=fail but dkim=pass is typically fine, as the message still passes DMARC overall.
DMARC aggregate reports follow RFC 7489. All compliant reports use the same structure regardless of which mailbox provider sent them. Use this field reference during any report review:
Once you know these four patterns, DMARC reports become much easier to read. Instead of scanning a wall of XML, you can sort each record into a clear category.
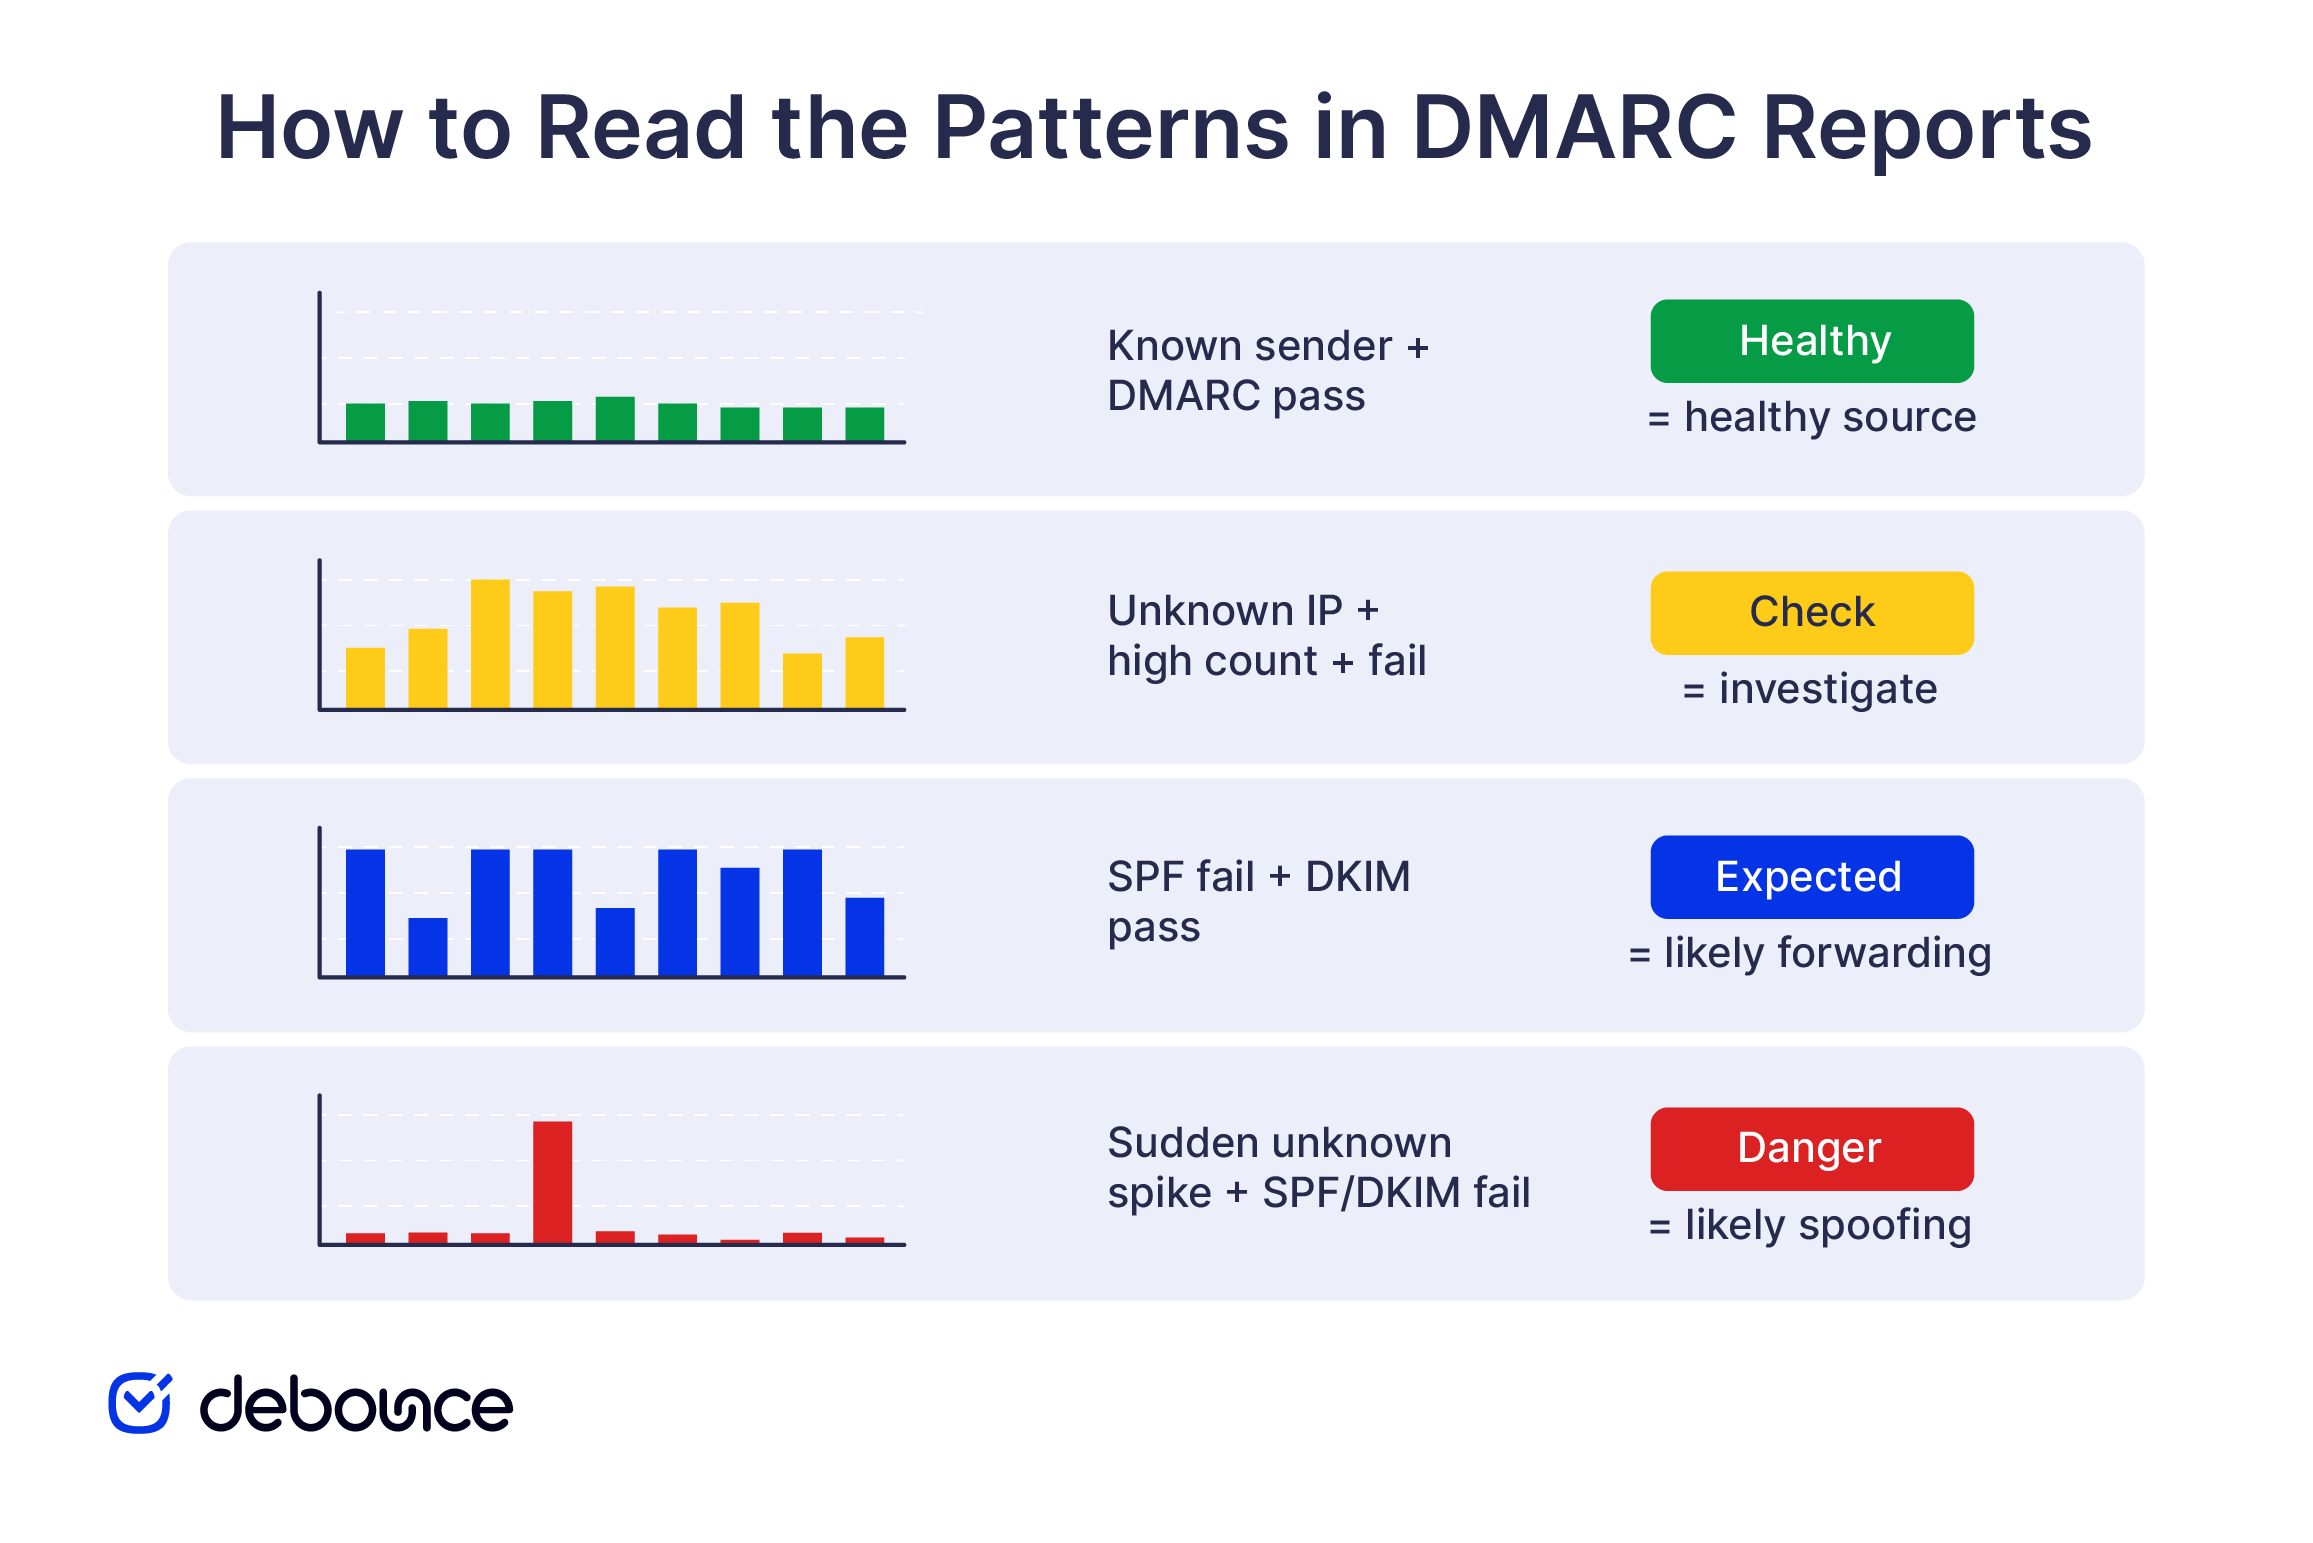
A known sender, like your ESP, marketing platform, helpdesk, or CRM, appearing in the report with both dkim=pass and spf=pass means the setup is working correctly for that source.
Verify the source IP belongs to the expected provider via reverse DNS, especially for high-count records. A large volume of mail from a known IP with dmarc=pass is expected. Confirm it once, then treat it as a baseline for future reports.
Unfamiliar IPs sending hundreds or thousands of messages with dmarc=fail fall into one of two categories: unauthorized senders actively spoofing your domain, or a forgotten legitimate sender (an old marketing tool, a shadow IT integration) that was never properly authenticated.
Investigate by checking IP WHOIS and reverse DNS records. A known spam IP usually points to spoofing, while a forgotten SaaS platform usually points to an authentication problem. Those two cases need different responses: block or reject spoofed mail, but fix SPF or DKIM alignment for legitimate senders.
A message that fails SPF but passes DKIM often points to email forwarding. The forwarding server is not listed in the original sender’s SPF record, so SPF fails. But DKIM works differently. It signs the message headers, and that signature often stays intact when the email is forwarded. That is why DKIM can still pass even when SPF fails.
DMARC passes overall whenever either SPF or DKIM aligns, so these records are not a problem. For domains with recipients who use mail forwarding, this is expected behavior. The report is showing how forwarding affects authentication, not a failed DMARC setup.
A previously unseen IP suddenly sending high message volume with both SPF and DKIM failing is the classic spoofing signature. Someone is sending email claiming to be from your domain through their own infrastructure, attempting to bypass spam filters by borrowing your domain’s trust signals.
Check the IP in threat intelligence tools such as AbuseIPDB or Cisco Talos. If the IP is linked to spam or abuse, the spike is likely malicious. This is when moving toward p=reject becomes important. Once all legitimate senders are aligned, full enforcement helps block spoofed mail before it can damage your email sender reputation.
Most teams move from manual XML review to an automated parser within the first week of receiving reports. The choice depends on volume, budget, as well as how deep the analysis needs to go.
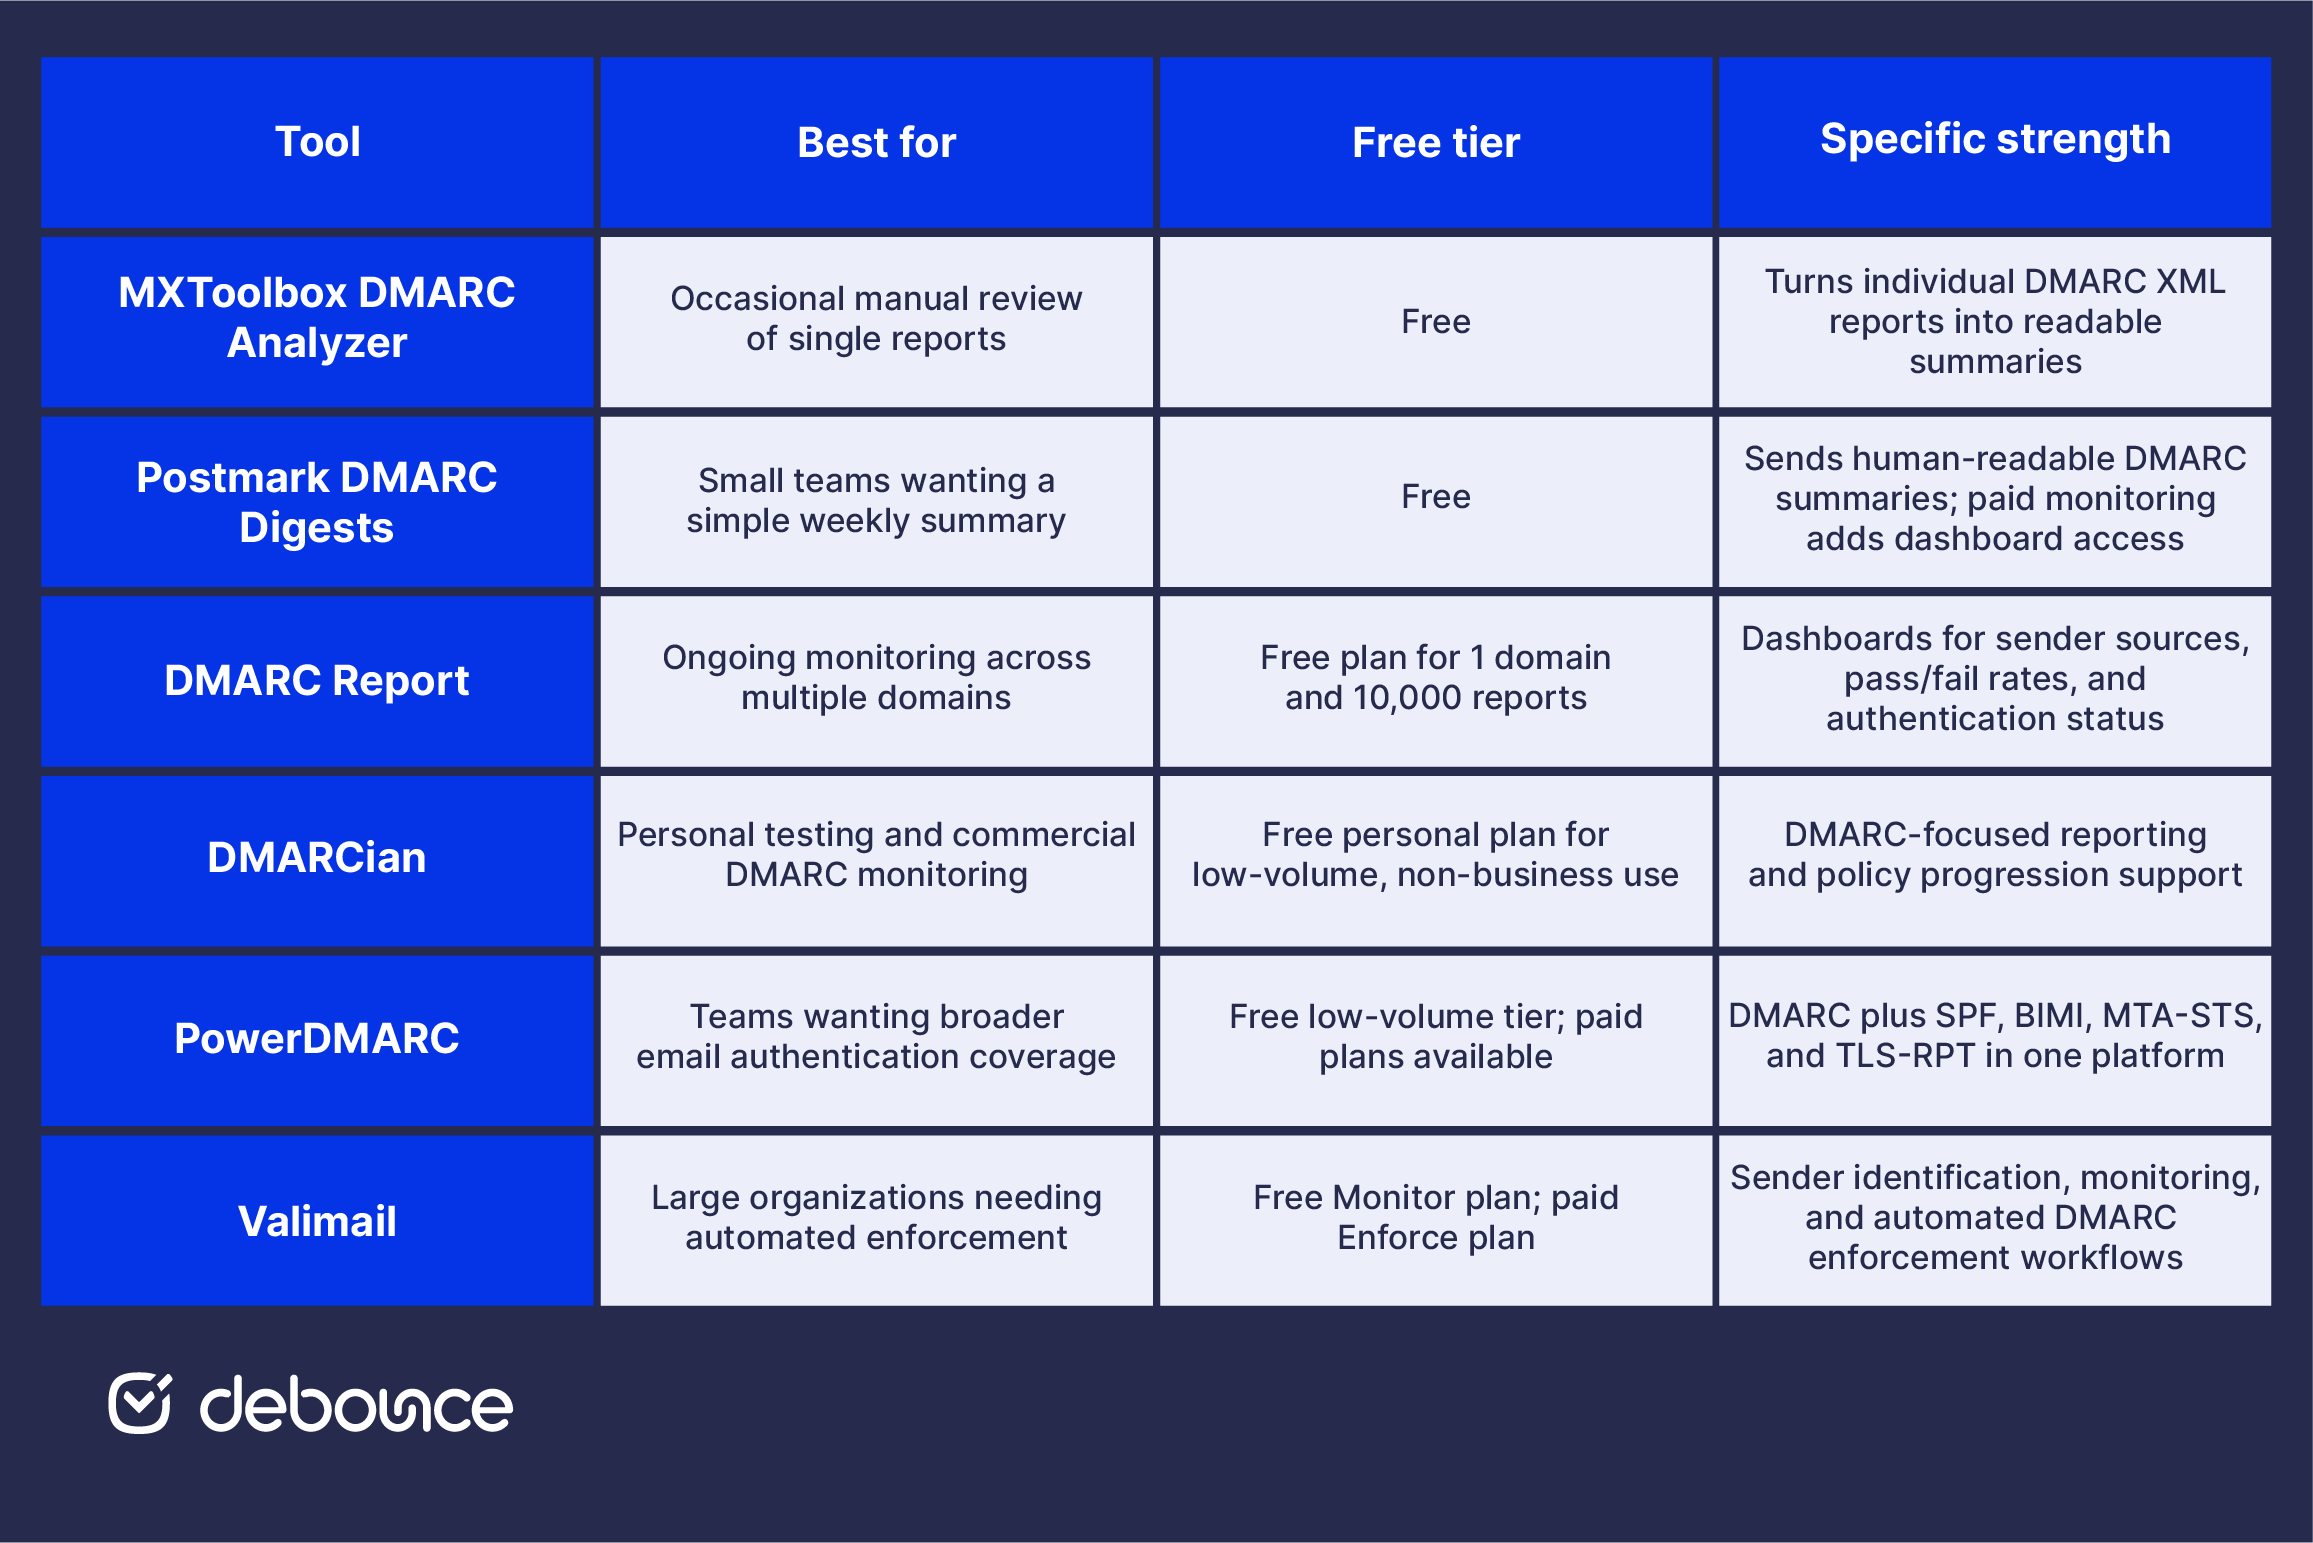
For most teams starting out, MXToolbox for occasional manual checks and Postmark DMARC Digests for passive monitoring is a practical free combination. Move to a dedicated analyzer like DMARCian when the number of domains or daily report volume makes manual review impractical.
Reading DMARC reports only helps if you use them to make decisions. The process is simple: identify every sender, fix alignment issues, then move toward enforcement.
Pair tightening with strong list hygiene throughout. Authentication confirms the email came from you, while clean lists prevent the bounce rates that damage reputation regardless of authentication state. Validating lists before major sends keeps bounce rates in check, and cleaning your email list of stale or invalid contacts protects the reputation signals that support each stage of policy progression.
DMARC aggregate reports are operational data. The point is not to read them for theory, but to act on what they reveal. Fix legitimate senders that fail alignment. Investigate unfamiliar IPs. Move toward enforcement once your trusted sources are passing consistently.
The goal is a boring report: known sources, steady pass rates, and no sudden volume spikes from unknown IPs. That predictability is what makes p=reject safe, and p=reject is what protects your domain from impersonation.
As part of your alignment phase, validate your sending lists with DeBounce. Email List Validation removes invalid, disposable, and high-risk addresses from the lists feeding your authenticated sending streams, which keeps bounce rates low and protects the reputation you’re building through authentication. Upload your list, remove what doesn’t belong, and send with confidence that clean authentication and clean data are working together.
Aggregate reports are daily XML summaries covering all authentication results across a reporting window; forensic reports are real-time alerts about individual failed messages. Forensic reports have become uncommon due to privacy concerns: most providers no longer send them, and most teams rely exclusively on aggregate reports.
Aggregate reports are typically sent once per day by each reporting organization, covering the previous 24-hour window. Large providers like Google and Microsoft send reports daily; smaller providers may send them less frequently or not at all.
Either no email was sent from the domain during the report window, or the rua= address is misconfigured, and reports aren’t reaching the inbox. Confirm the rua= tag in the DNS record is correct, and the mailbox exists and accepts external mail.
In the first two weeks, sample a few daily reports to learn the pattern of your specific senders. After that, automated tools should flag anomalies. Read full reports only when something unusual appears in the summary dashboard.
A minimum of 2–4 weeks at p=none to inventory all senders, plus another 2–4 weeks confirming consistent alignment before moving to p=quarantine. Then 2–4 weeks at p=quarantine before advancing to p=reject. Tighten only when reports show consistent pass rates across multiple consecutive reporting cycles.
Find quick answers to your questions about our pricing and plans.

Email marketing can be a blessing and a curse - especially when not done correctly. The days of email blasts are gone but not forgotten....

Greylisting temporarily rejects mail from unrecognized sender–recipient–IP combinations with a 4xx “try again later” response. Legitimate servers retry; many crude spam tools do...


Both SPF and DKIM must be configured and aligned with your sending domain before DMARC works correctly. Publishing DMARC over broken authentication causes...

Email List Segmentation is one of the modern marketing techniques that allow companies to pander to their target customers. Companies with their products and services...


Email size limits apply to the complete message, including body text, inline images, and all attachments combined. Email encoding (Base64) increases file sizes...

A PTR record maps an IP address back to a hostname, and mail servers use it to verify the network-level identity of a...
